Home ESS Setup
Recently I've planned, installed and automated a home battery energy storage system.
Quite a lot of research went into this. Thanks to James at Bimble Solar, Paul Swinford the Electrician and the team at Fogstar energy for going above and beyond helping me get this sorted.
There were lots of questions that weren't that easy to find answers for during this process and considering I expect this to save me close to £900 per year and pay for itself in under 6 years, I thought I'd write down everything I went through to help anyone else considering this journey!
I've broken this up into three sections (and an update):
Planning
I started looking into a battery system when I saw that on the Intelligent Octopus Go (IOG) tariff, your entire house is eligible for their 7p/kWh rate when the EV is charging overnight. We're getting an PHEV later in the year, so will be able to go onto that tariff.
The IOG tariff is 29p/kWh during the day and 7p/kWh during the overnight off-peak window (23:30 - 05:30). Based on our average daily usage of 13kWh, if we managed to shift all of our usage to the 7p/kWh rate, my rough maths said we could be saving ~£950 per year!
That's enough to make a deeper investigation very worthwhile!
Choosing the system
The fundamental idea is to load-shift our electricity usage to when the cost is a lot cheaper. To do this, we need to charge the battery when electricity is cheapest and use the battery to power the house when it's more expensive.
Consideration Factors
There's a lot to consider when choosing the system?
- How big a battery?
- How big an inverter?
- Can you add solar now or later?
- How are various bits of the system going to talk to each other?
- How is the system going to work out when to charge and discharge?
- How will the ESS talk to an EV Charger?
- Can I Export to the grid to increase the RoI?
- Can I use the battery as a UPS, to keep the house running when the power goes out?
- Do I need to do any regulatory things?
The generic answers are quite easy
How big a battery? Big enough to cover the house's energy usage most of the time, extra capacity is extra cost and will be "wasted"
How big an inverter? Big enough to charge the battery during the cheap rates and big enough to cover most of the peak loads.
Can you add solar now or later? For most people, this is a yes or a maybe. However, we live in a conservation area, in a mid-terrace with a small south-facing roof space with a large gable end and our garage roof is nowhere near strong enough. So it's a clear no from us.
How are various bits of the system going to talk to each other? I already have Home Assistant, so we can use that, but it would be nice if it was a little more tightly coupled.
How is the system going to work out when to charge and discharge? Some sort of scheduling. IOG is pretty simple, but Octopus Agile is more complicated.
How will the ESS talk to an EV Charger? Again, Home Assistant is possible, but it would be nice if it was more integrated.
Can I export to the grid? No. But actually, maybe. I contacted Octopus support about export and their answer was the same "No, you need to be actually generating electricity to export, but if you have energy to export, then you must be generating!" I considered getting a bigger battery to facilitate this, however, I decided against it in the short term because of the uncertainty of the returns, and the complexity of planning when and how much to send to the grid. I've not closed the door on this possibility completely though, it's possible to add another battery to the system later to double the capacity.
Can I use the battery as a UPS? No. For a number of reasons. To have the battery as a UPS, the load needs to be after the inverter. So Grid > Inverter > Load. Our grid supply comes in at the front of the house and the battery is going into the garage, so the system will be Grid > Load > Inverter. It would be possible to run a secondary feed back to the house to power a separate essential circuit, Grid > Load > Inverter > Essential Load. That was too much work. This system is going to be Grid-Tied, so if the grid goes out, the system with shut off. One reason for this is, as we don't have any export limitation device, we don't want to be powering the grid when it's out. (Imagine if an engineer was working on something they expected to be off, and we were providing power, has the potential to get dangerous fast). Luckily we live in an area where the grid is really stable. We've had one power outage in the last 5 years.
Do I need to do any regulatory things? Yes. I need to notify National Grid about this via a G99 application. This must be done within 28 days of the install. It's worth considering an inverter that is already G99 approved. (The Multiplus-II I decided on, is. It's ENA Number is VICEN/10792/V1)
Options
There are some really nice, tightly integrated systems that are offered by Solar installers. It's big business, and I spoke to quite a few providers, for no specific reason I narrowed down my integrated systems to GivEnergy and MyEnergi. These both were tightly integrated systems with great support.
For comparison, I ended up settling with a quote for a MyEnergi System.
The company who quoted for the GivEnergy system (CES Solar Shop) were extremely pushy and not very knowledgeable, slating the alternatives I was discussing without giving evidence. The quote I had for this system was over 12k for 13.5kWh of storage with a 6kW inverter.
MyEnergi seemed like a better solution overall; the quotes I had were better, both in terms of cost and customer service. The MyEnergi quote for 15kWh of batteries came to ~£7000 and 20kWh came to ~£9000.
The other option is a lot more modular and requires more DIY work. A 16.1kWh battery from Fogstar energy, backed by UK-based customer support, and a 10-year warranty is only £2000. Plus an inverter and Paul's installation quote brought the total cost to as little as £4000.
Analysis (Payback Calculator)
It looks as though the DIY approach was the better option, but I wanted to really verify the rough calculations I had done previously and work out what the best battery and inverter capacity were to go for.
I couldn't find a good online calculator for a home ESS system without solar. Gary Does Solar has a brilliant calculator for solar installations but it didn't work great for what I was looking at. As I couldn't find a good calculator, I built one.
The Battery Payback Calculator takes your last year of electricity readings from Octopus (easy to download from your account page) and lets you configure the systems you are considering. It returns details about your energy usage and an analysis of the batteries you are looking at. If you want to give it a play, you can download some example energy readings here (Coming soon).
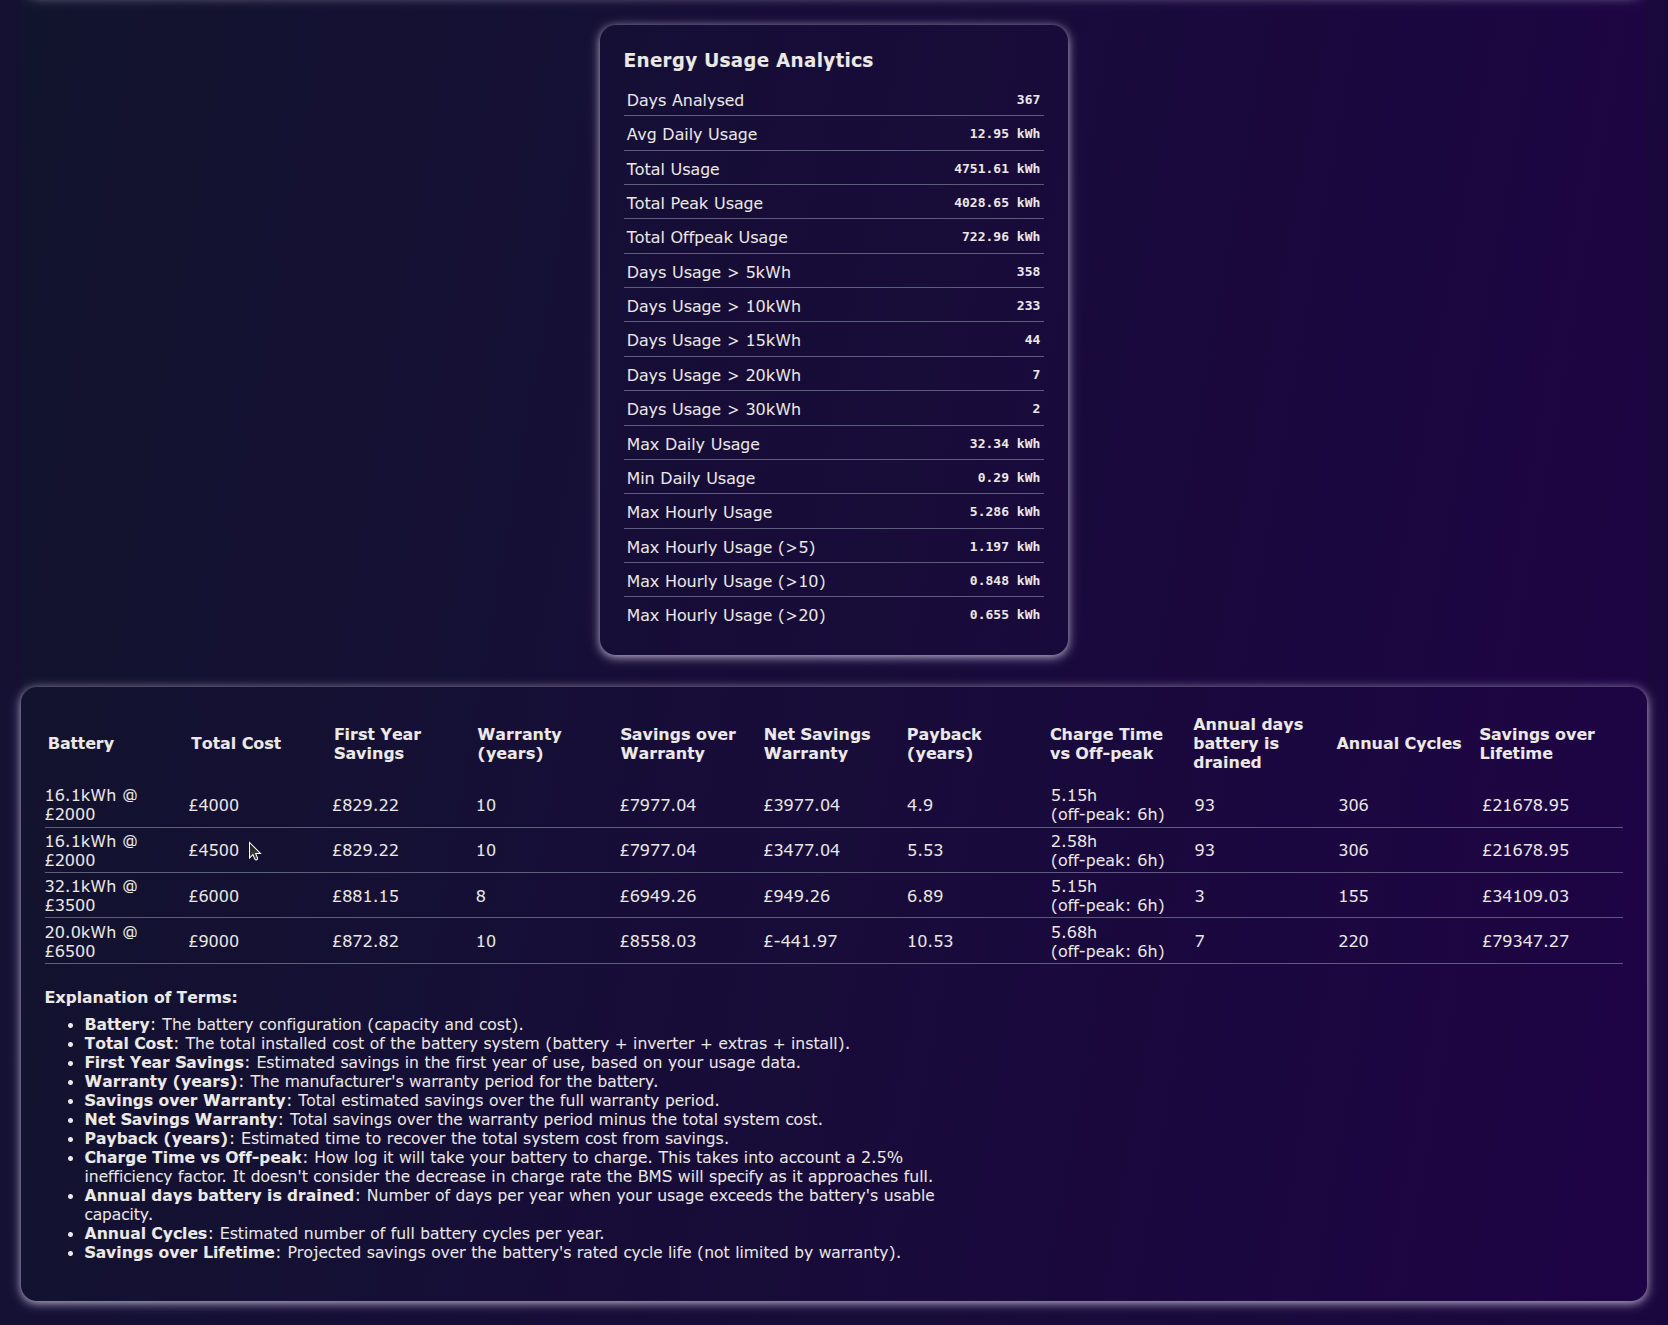
Click or Tap to open a new tab to see clearer
From that screenshot, we can see that more than 15kWh of storage is probably the sweet spot and there is 4000kWh of usage during the peak rate times that I can aim to offset.
The four battery options in that comparison are the Fogstar 16.1kWh battery with either the 48/5000/70-50 or 48/8000/110-100 Multiplus-II inverter from Victron, a 32,1kWh Fogstar battery with the larger Victron MP-II inverter and the 20kWh MyEnergi system
I did look at other inverters, from SolarX, SunSync and others. A lot of the others seem to focus on integration with solar. Victron has great community support, has a strong Home Assistant integration and a really good reputation.
Looking at the battery comparison, I might have been better off going for the smaller inverter, but the larger inverter felt a bit more versatile and "future proof" should the Octopus cheap rate window change, for example. It also means that it can cover more of the peaks in usage such as when the oven and kettle and washing machine are all on at the same time.
Final System
- Fogstar Energy 16.1kWh Battery
- Victron Multiplus-II 48/8000/110-100
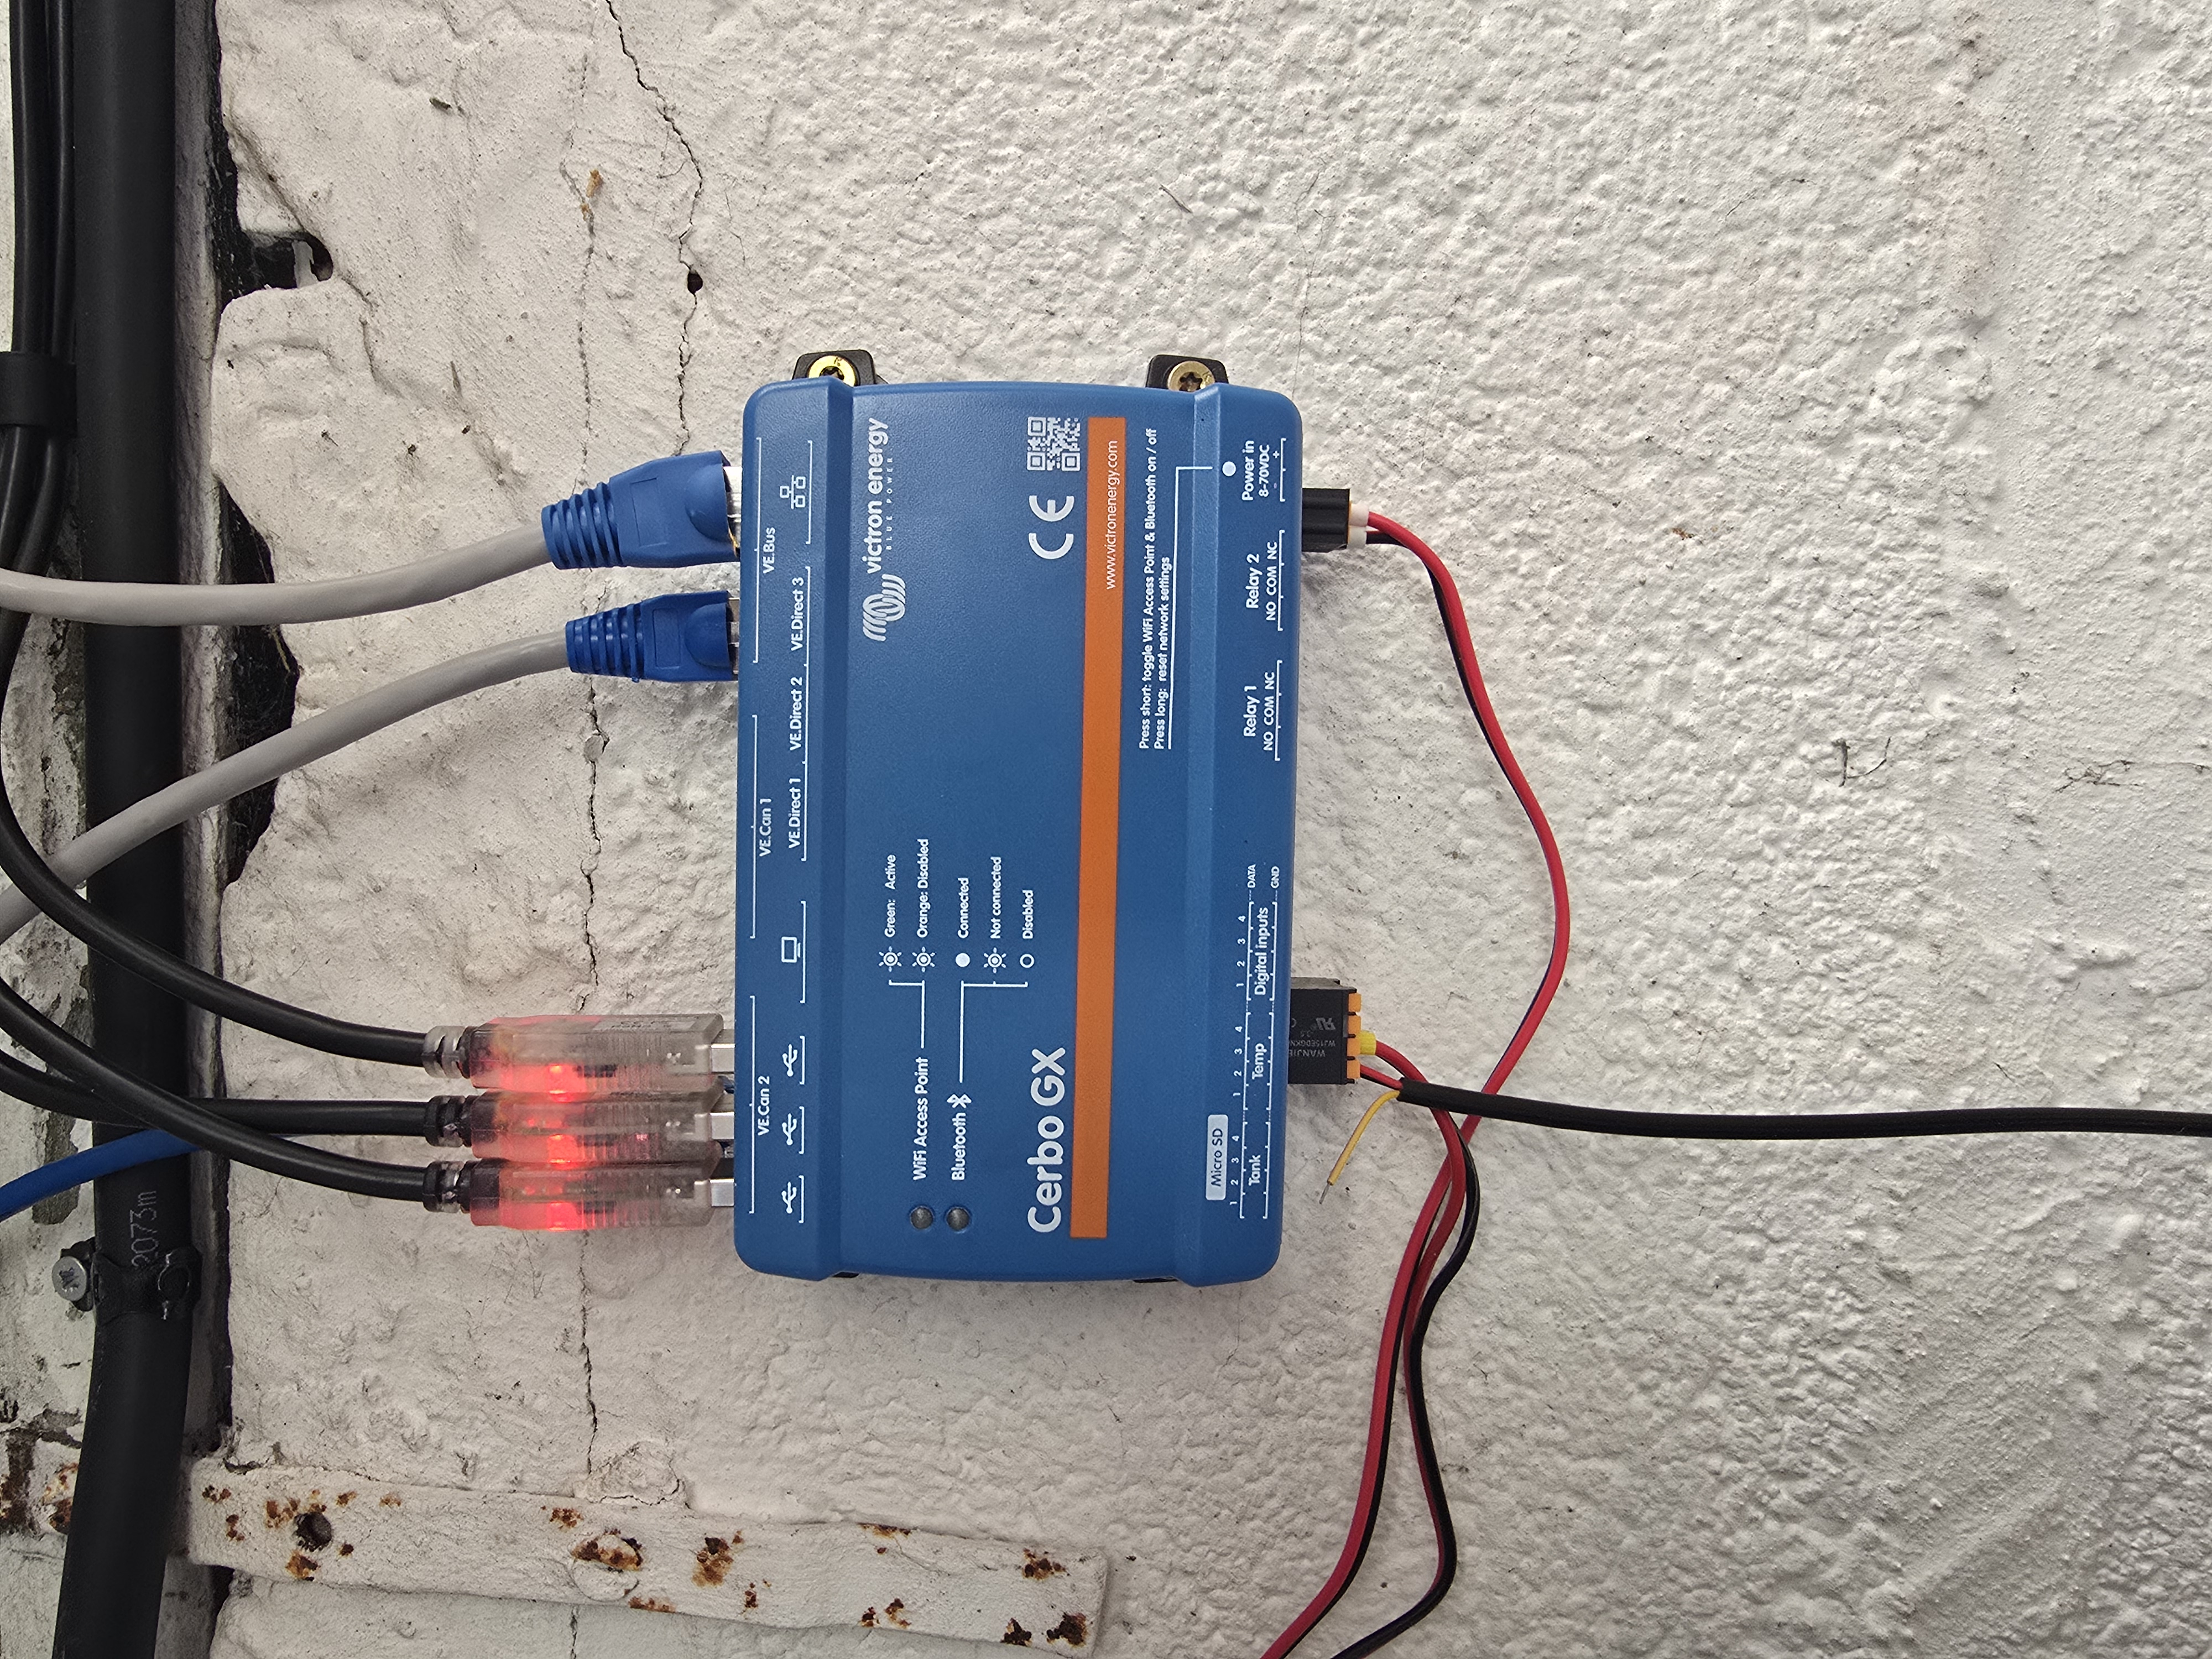
- CerboGX MKII
- 3 x ET112 -> Monitoring Grid, Feed to Garage and (Future) EVC
All Supplied by Bimble Solar
Layout and Design
As I decided to go for the more DIY approach, I then needed to work out extra bits of the installation. Paul the Electrician had already laid a new radial to the Garage, he confirmed that the cables were the right size. We double-checked the cable size calculations with several online calculators from various electrical wholesalers. At the same time he laid a Cat6 cable that ran from the mains-in at the front of the house to the garage, for measuring the grid load for the Victron ESS and the EV Charger.
There were still questions over whether usual CT clamps would work as sensors for the Victron system (they don't), how the CerboGX gets powered (DC direct from the battery) and what additional bits would be needed for the CerboGX to manage the battery (BMS-Can type B Cable).
After various questions on Reddit, the Victron Forums and the Octopus Agile forum, I ended up with the following design
.png)
Design of the system. Click to open a larger version
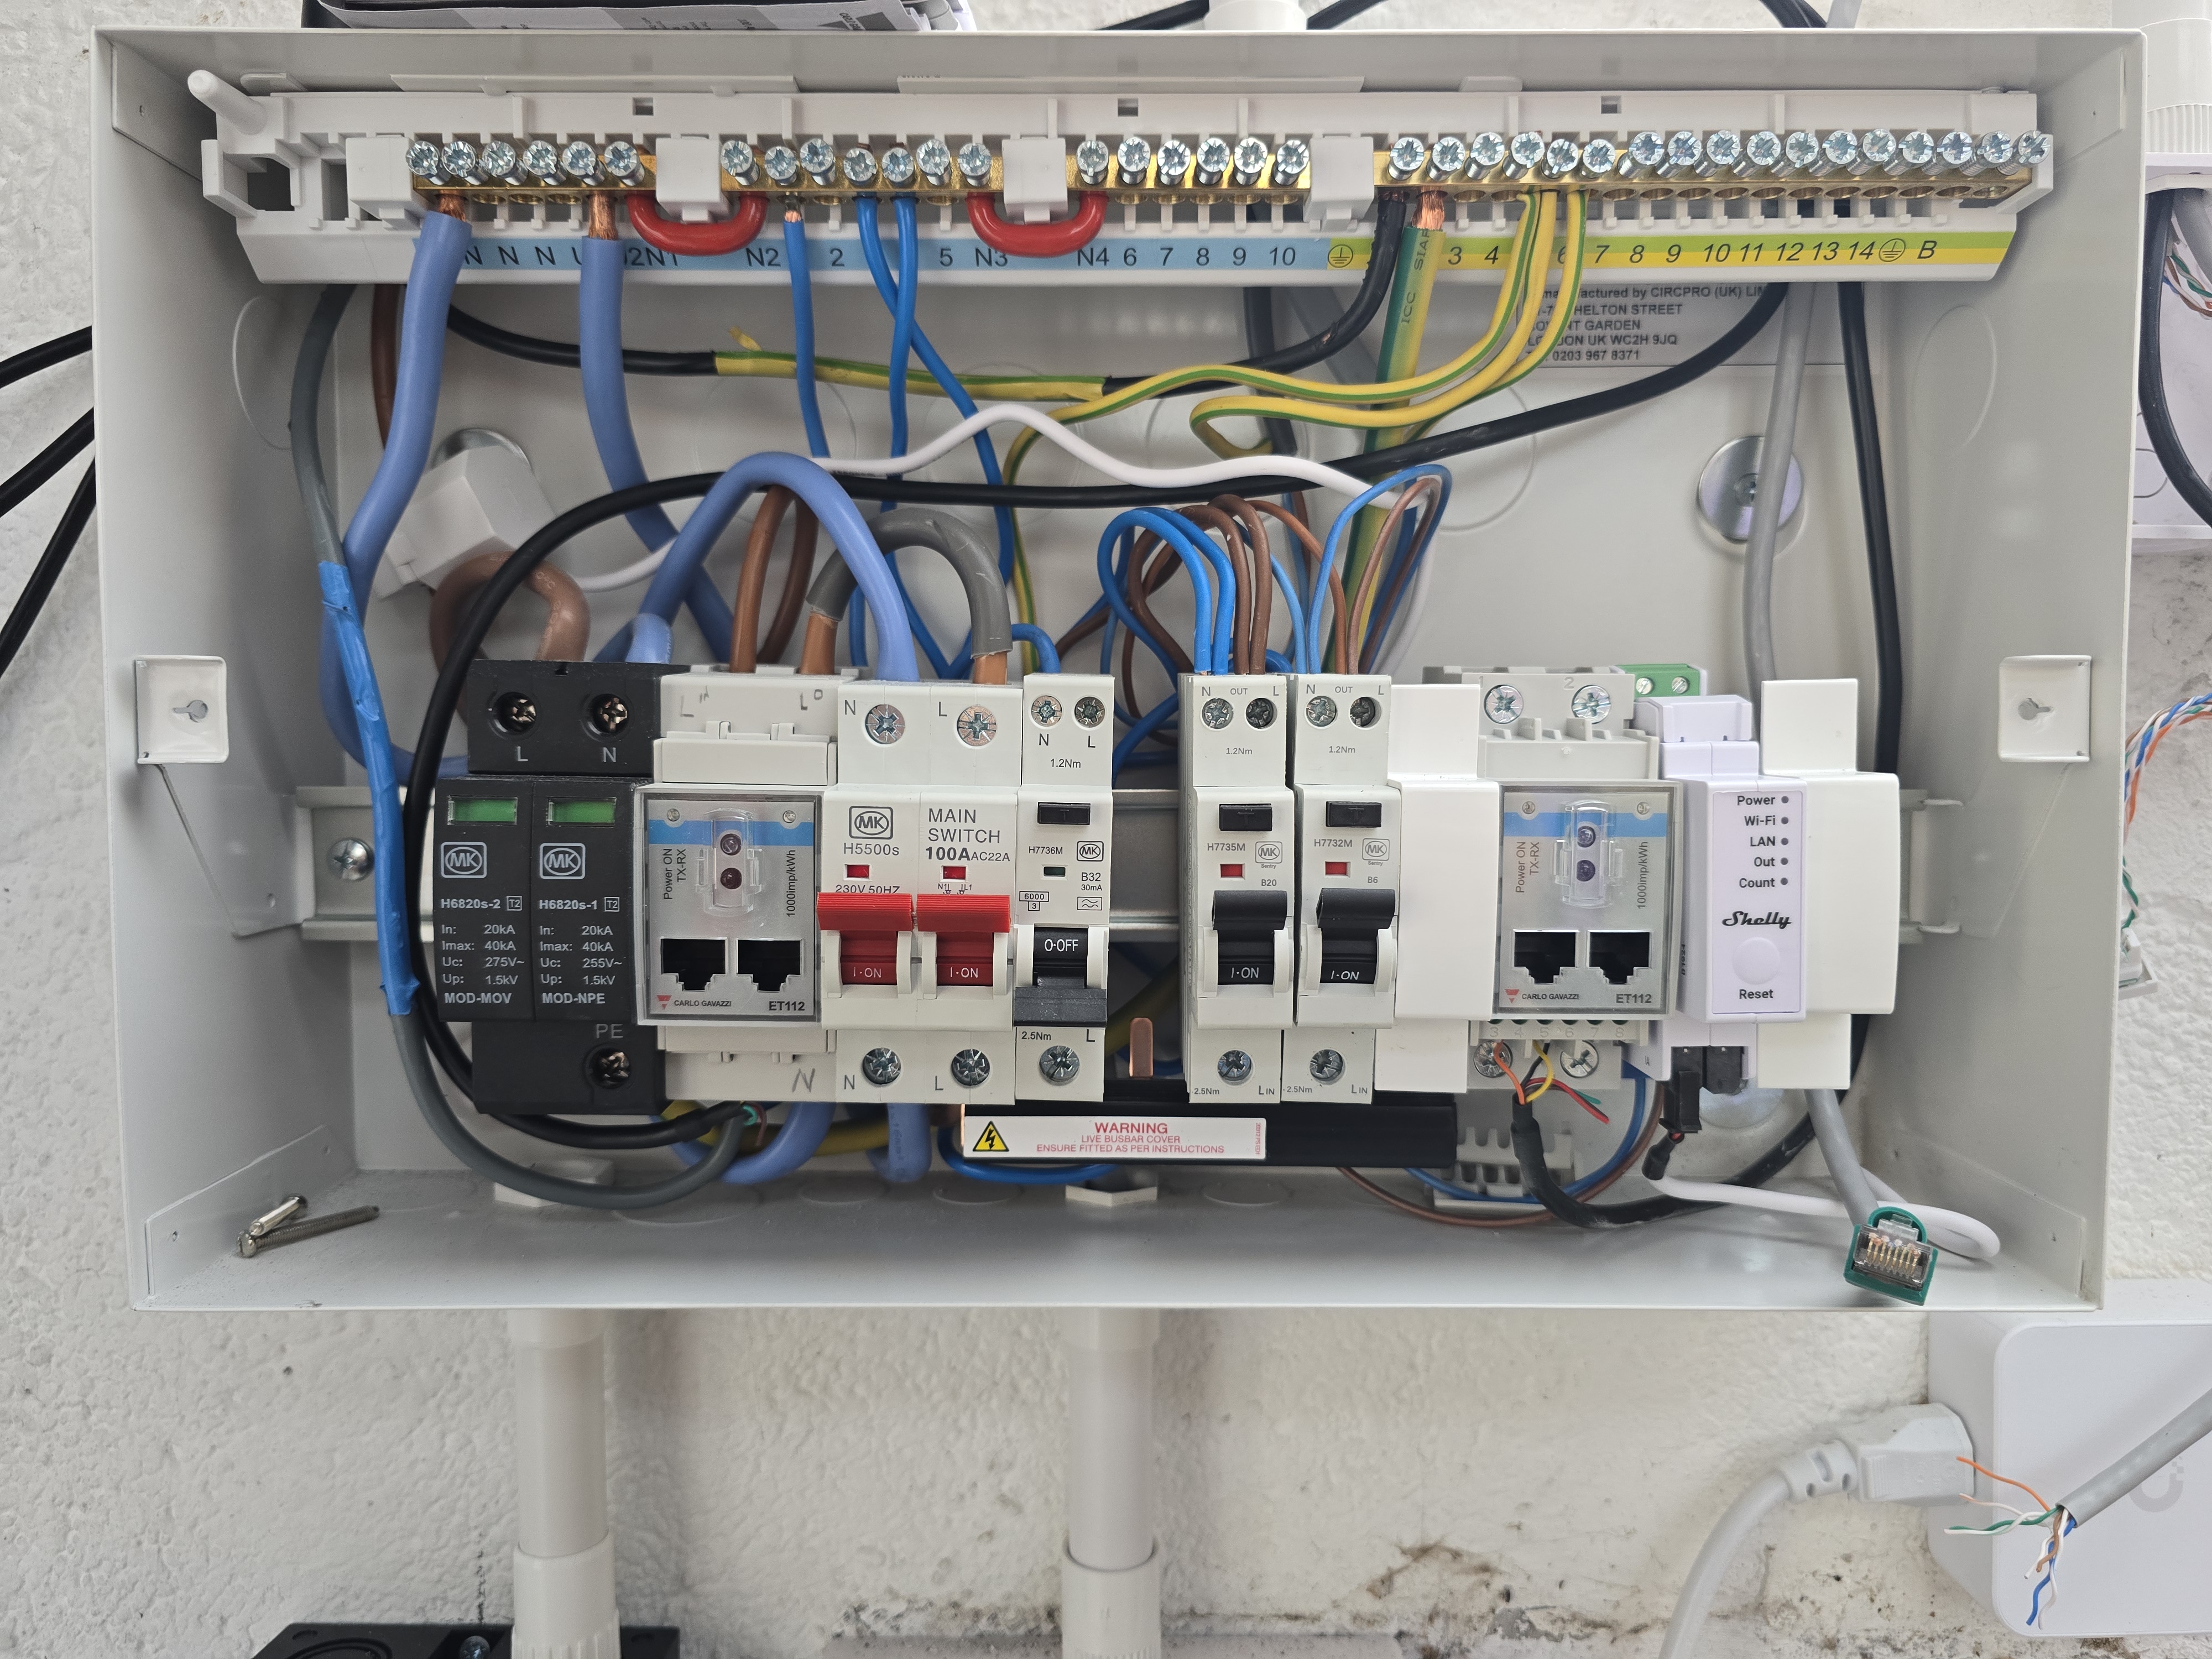
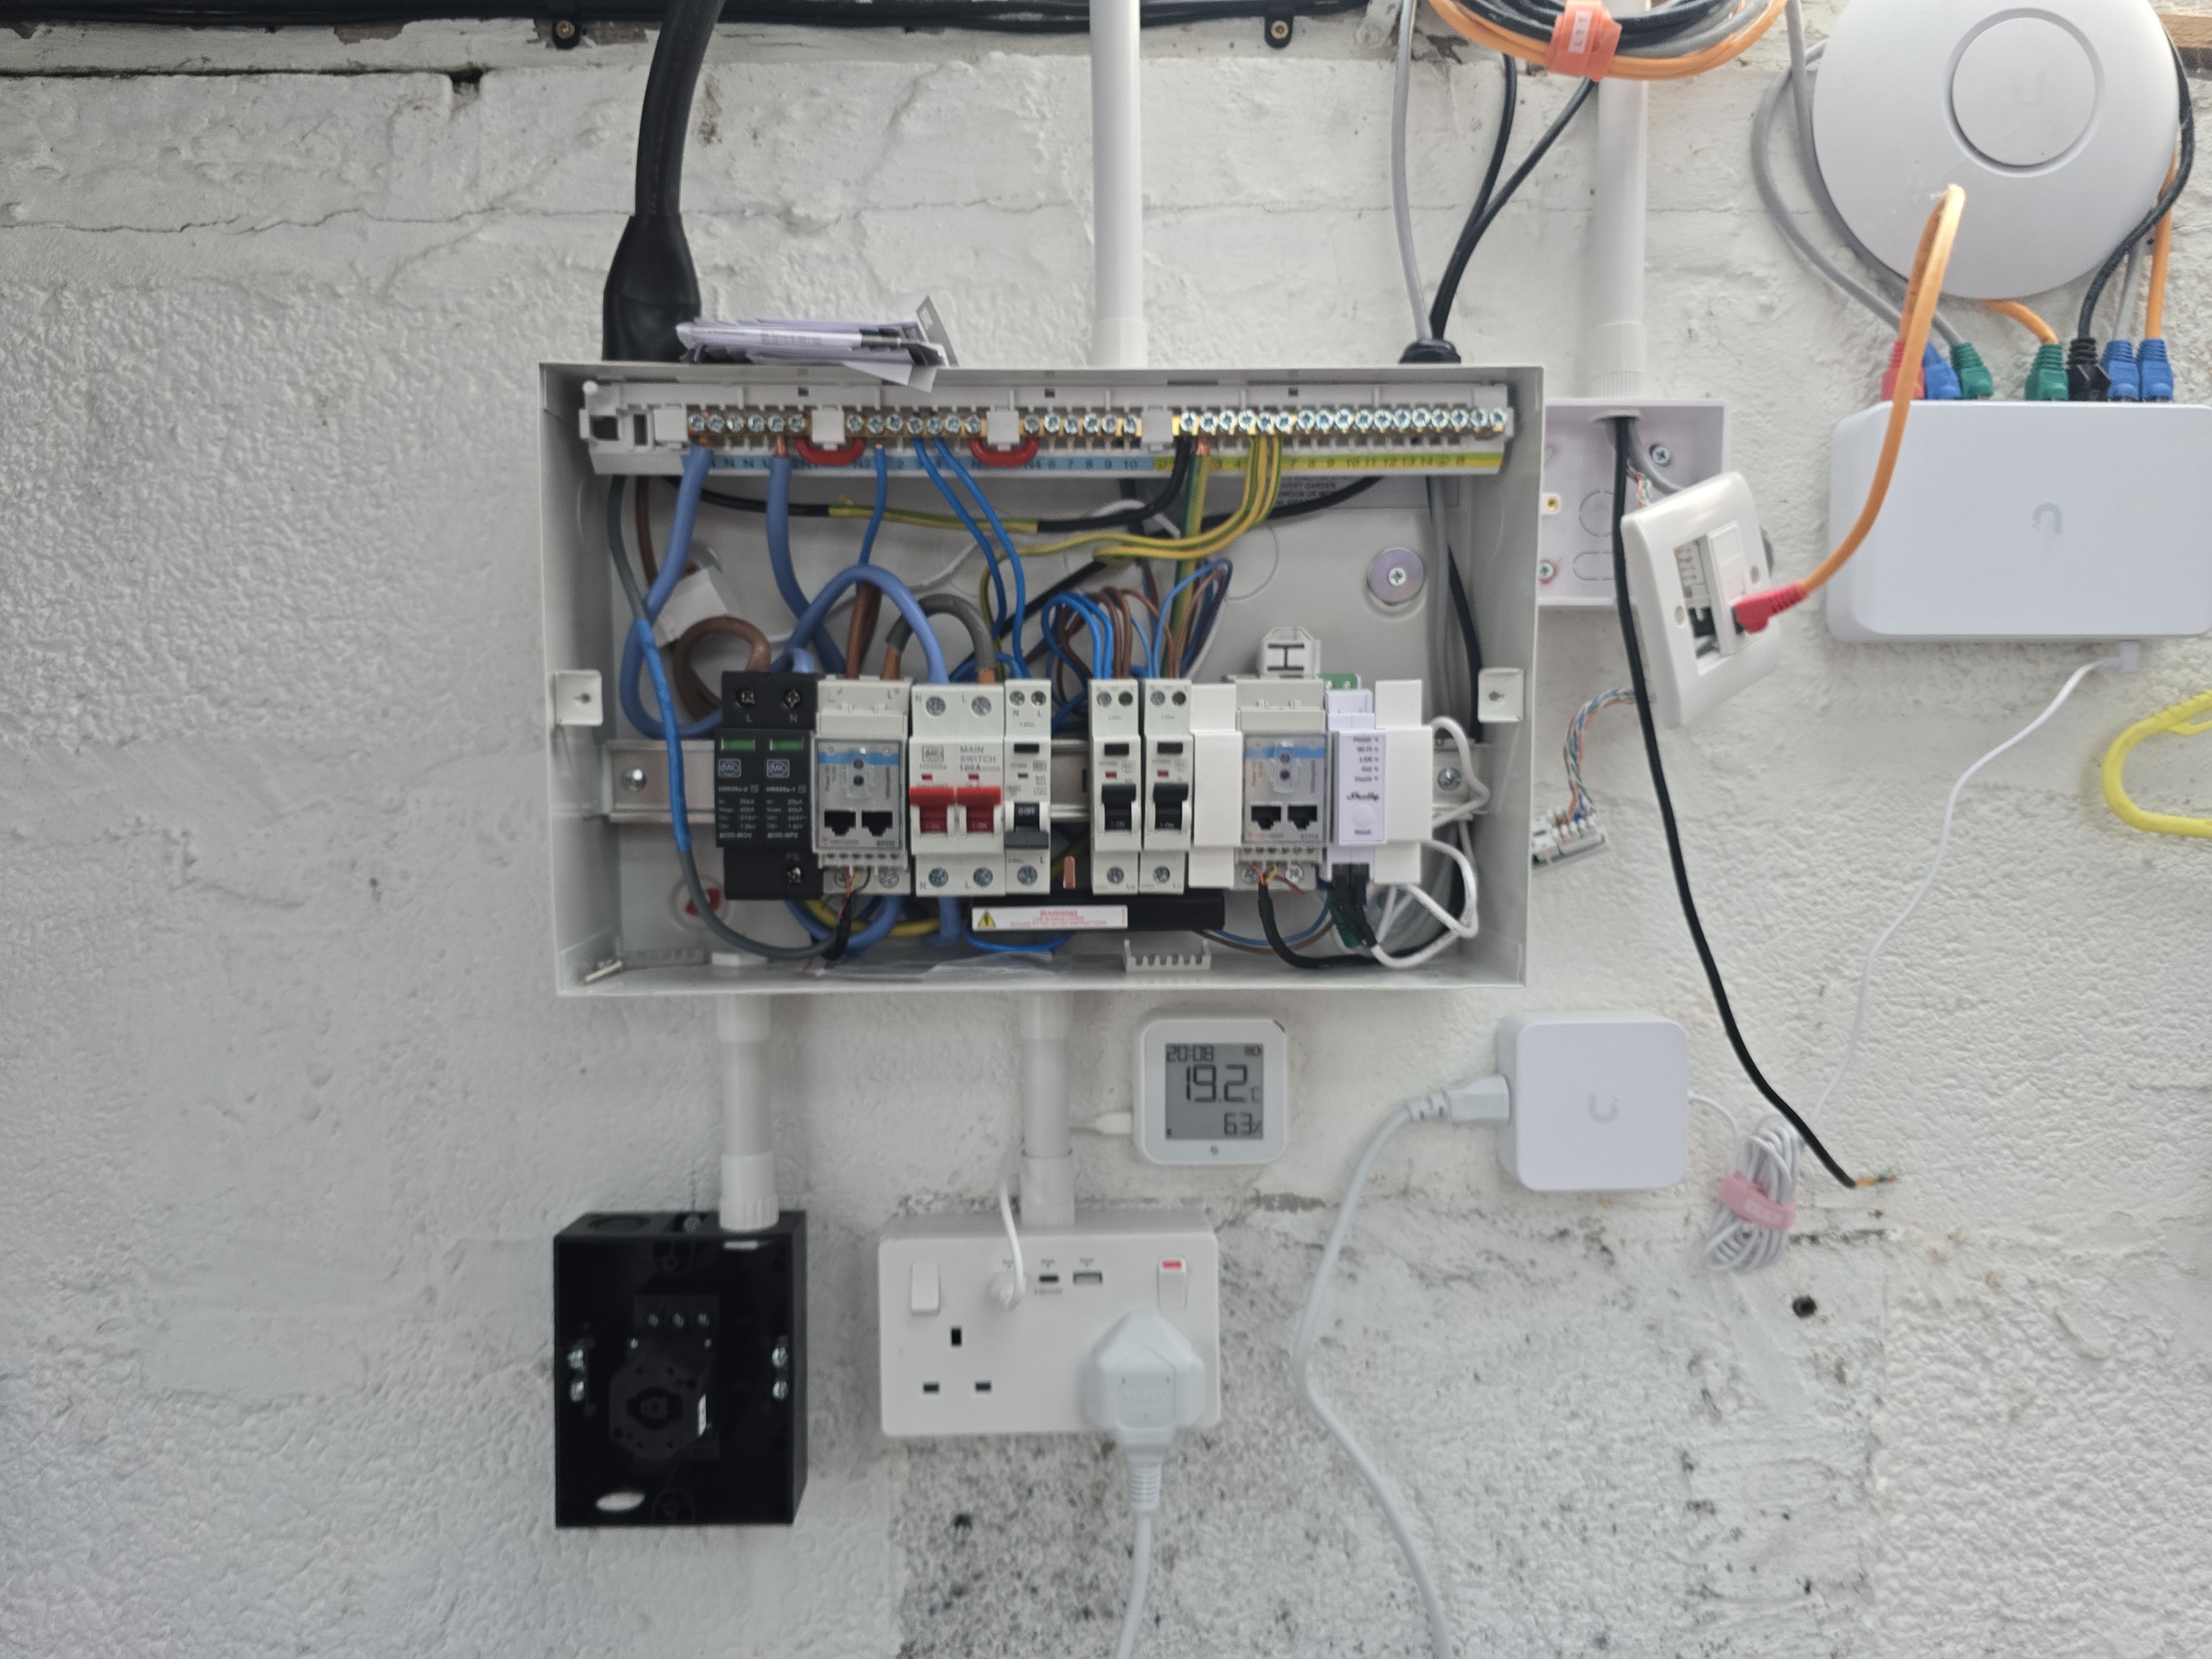
There's a bit of redundancy in the sensors here, in all the places where I have an ET112 sensor I also have a Shelly EM. The ET112s are more of a faff as they need to go in-line rather than using a CT Clamp, but they are required for the Victron ESS to work.
The Cerbo is powered from the battery and has M8 rings that can be added to the terminals in the MP-II
Installation and Configuration
Preparation
Last year, Paul updated the garage electrics and ran a larger AC cable, and two data cables. One for the local network and one for current sense. He'd also added a new CU into the garage with the space for all of this.
DC Side
48V is the top end of what counts as "Low Voltage" and as long as you're not touching live and neutral, its pretty safe, so I managed to get this all setup before Paul arrived.
AC Side
The AC was a little more involved, mostly because of the ET112 sensors.
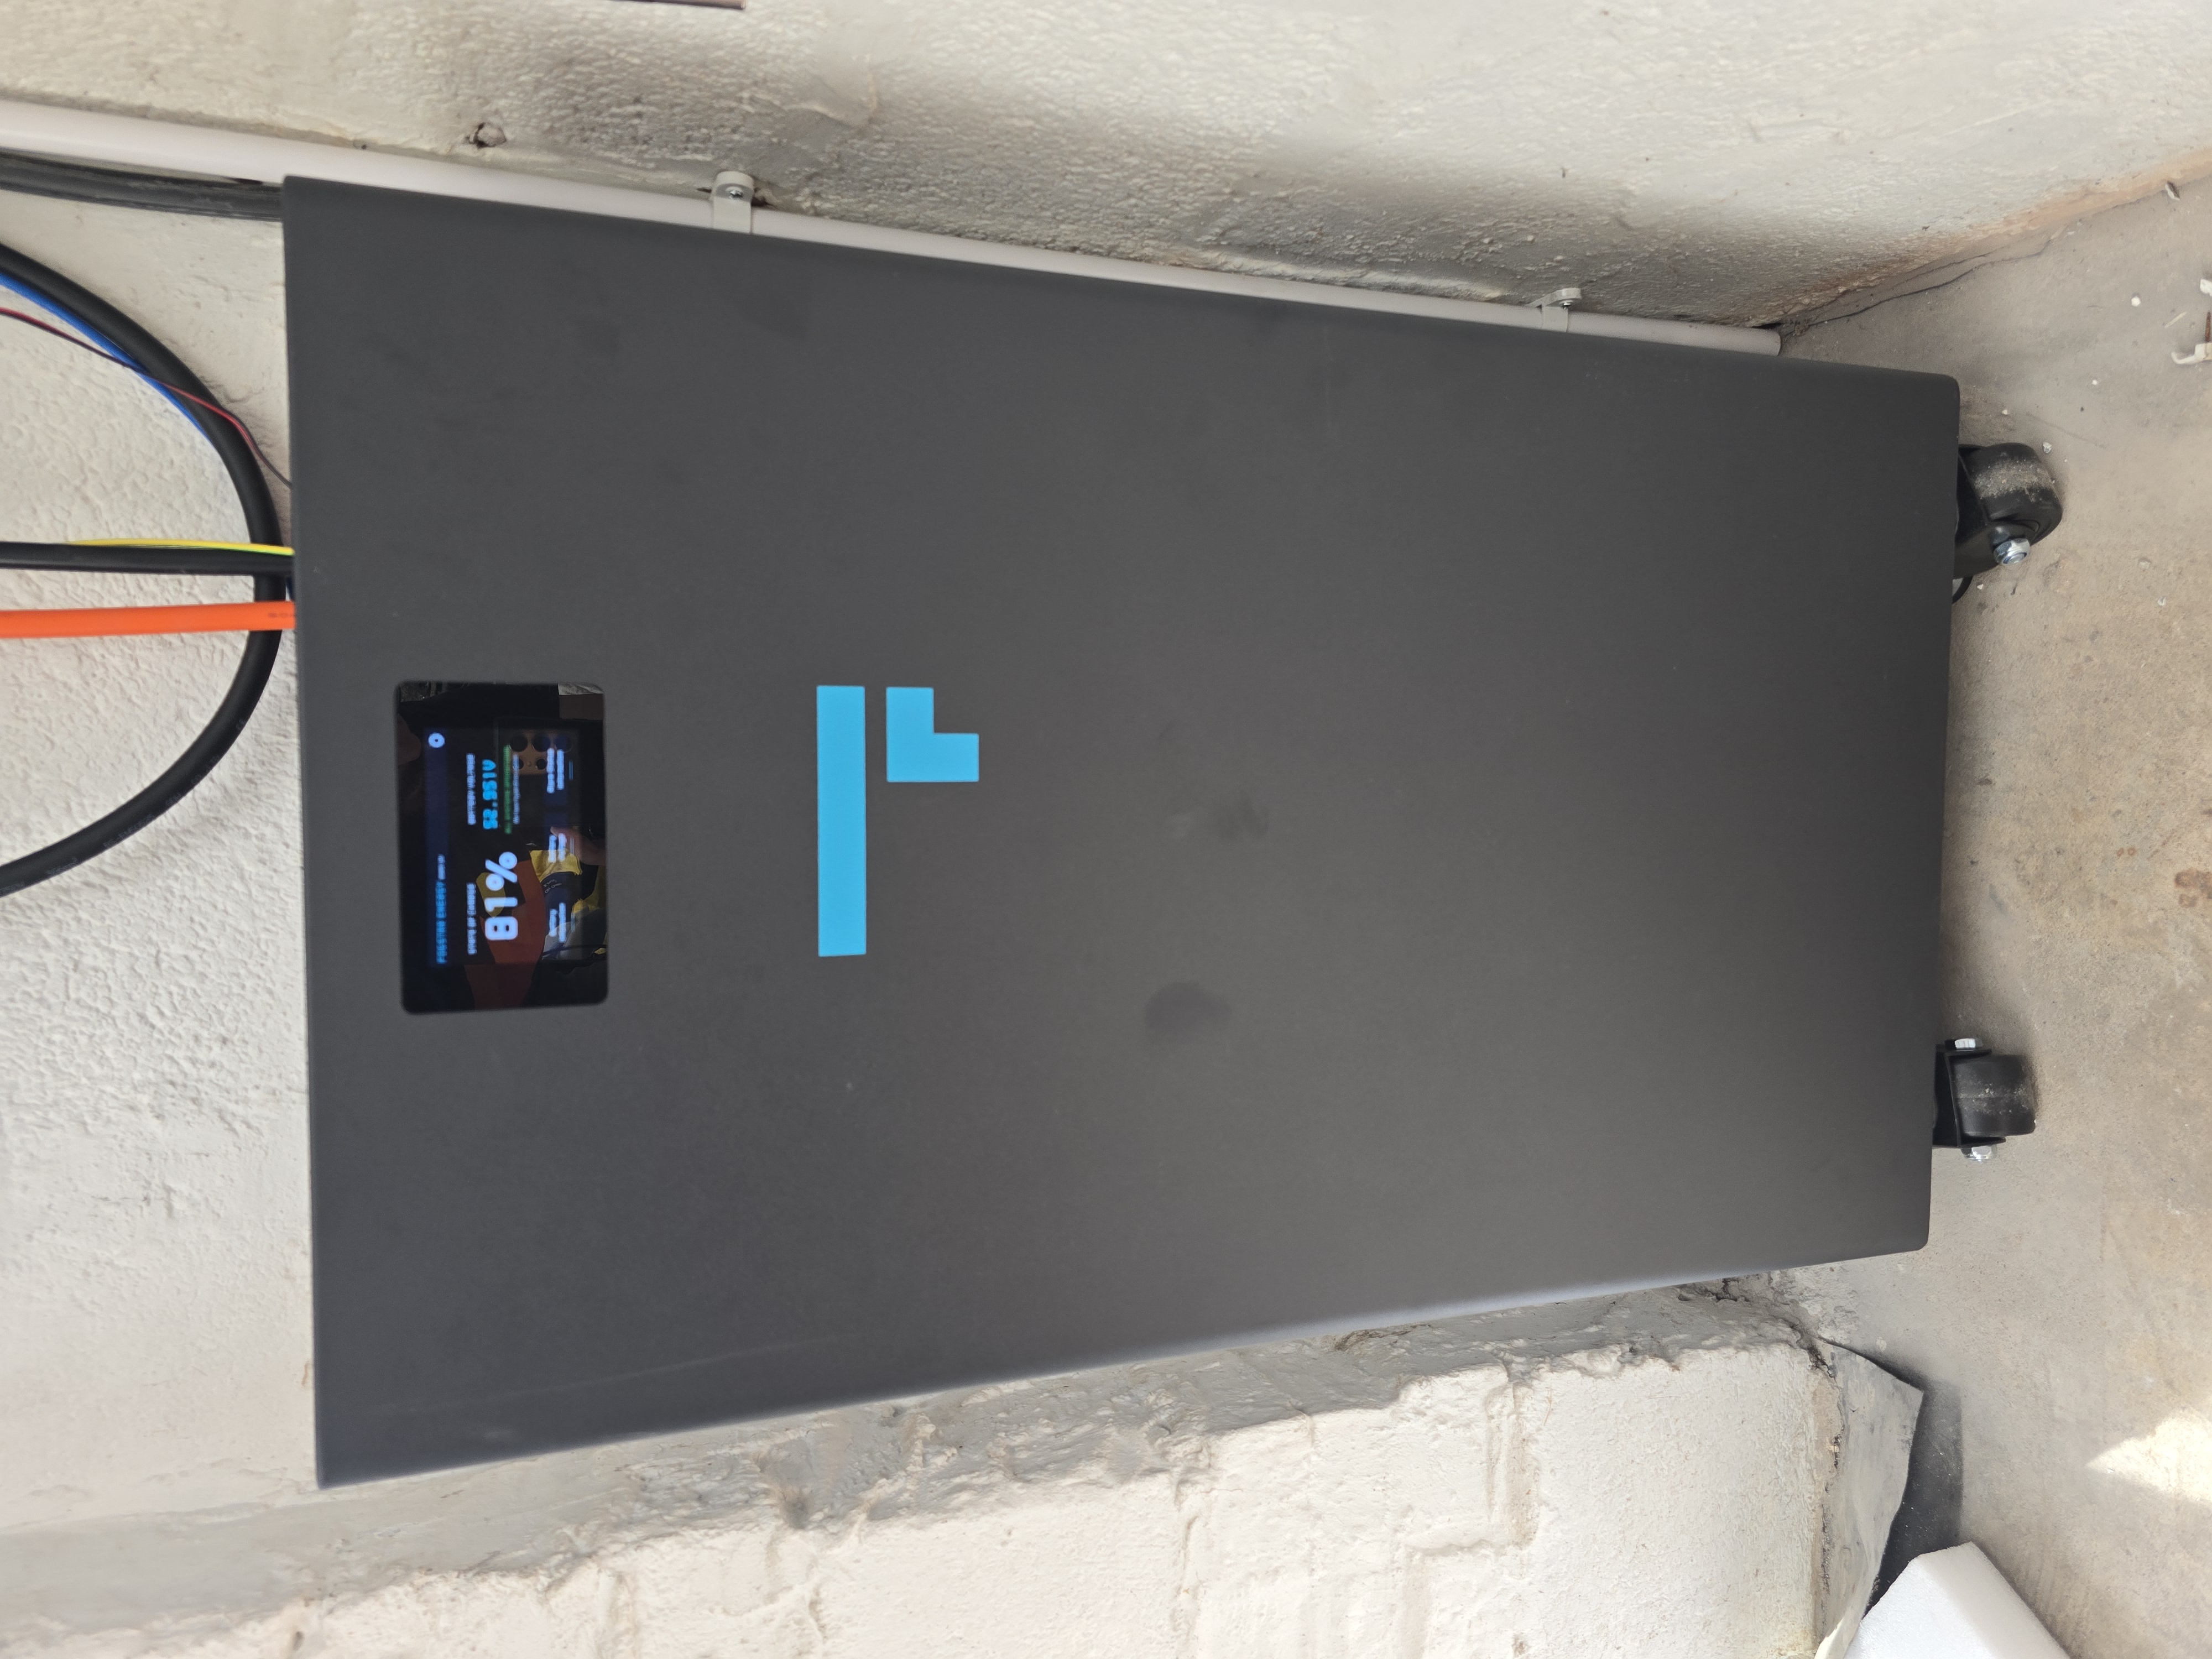
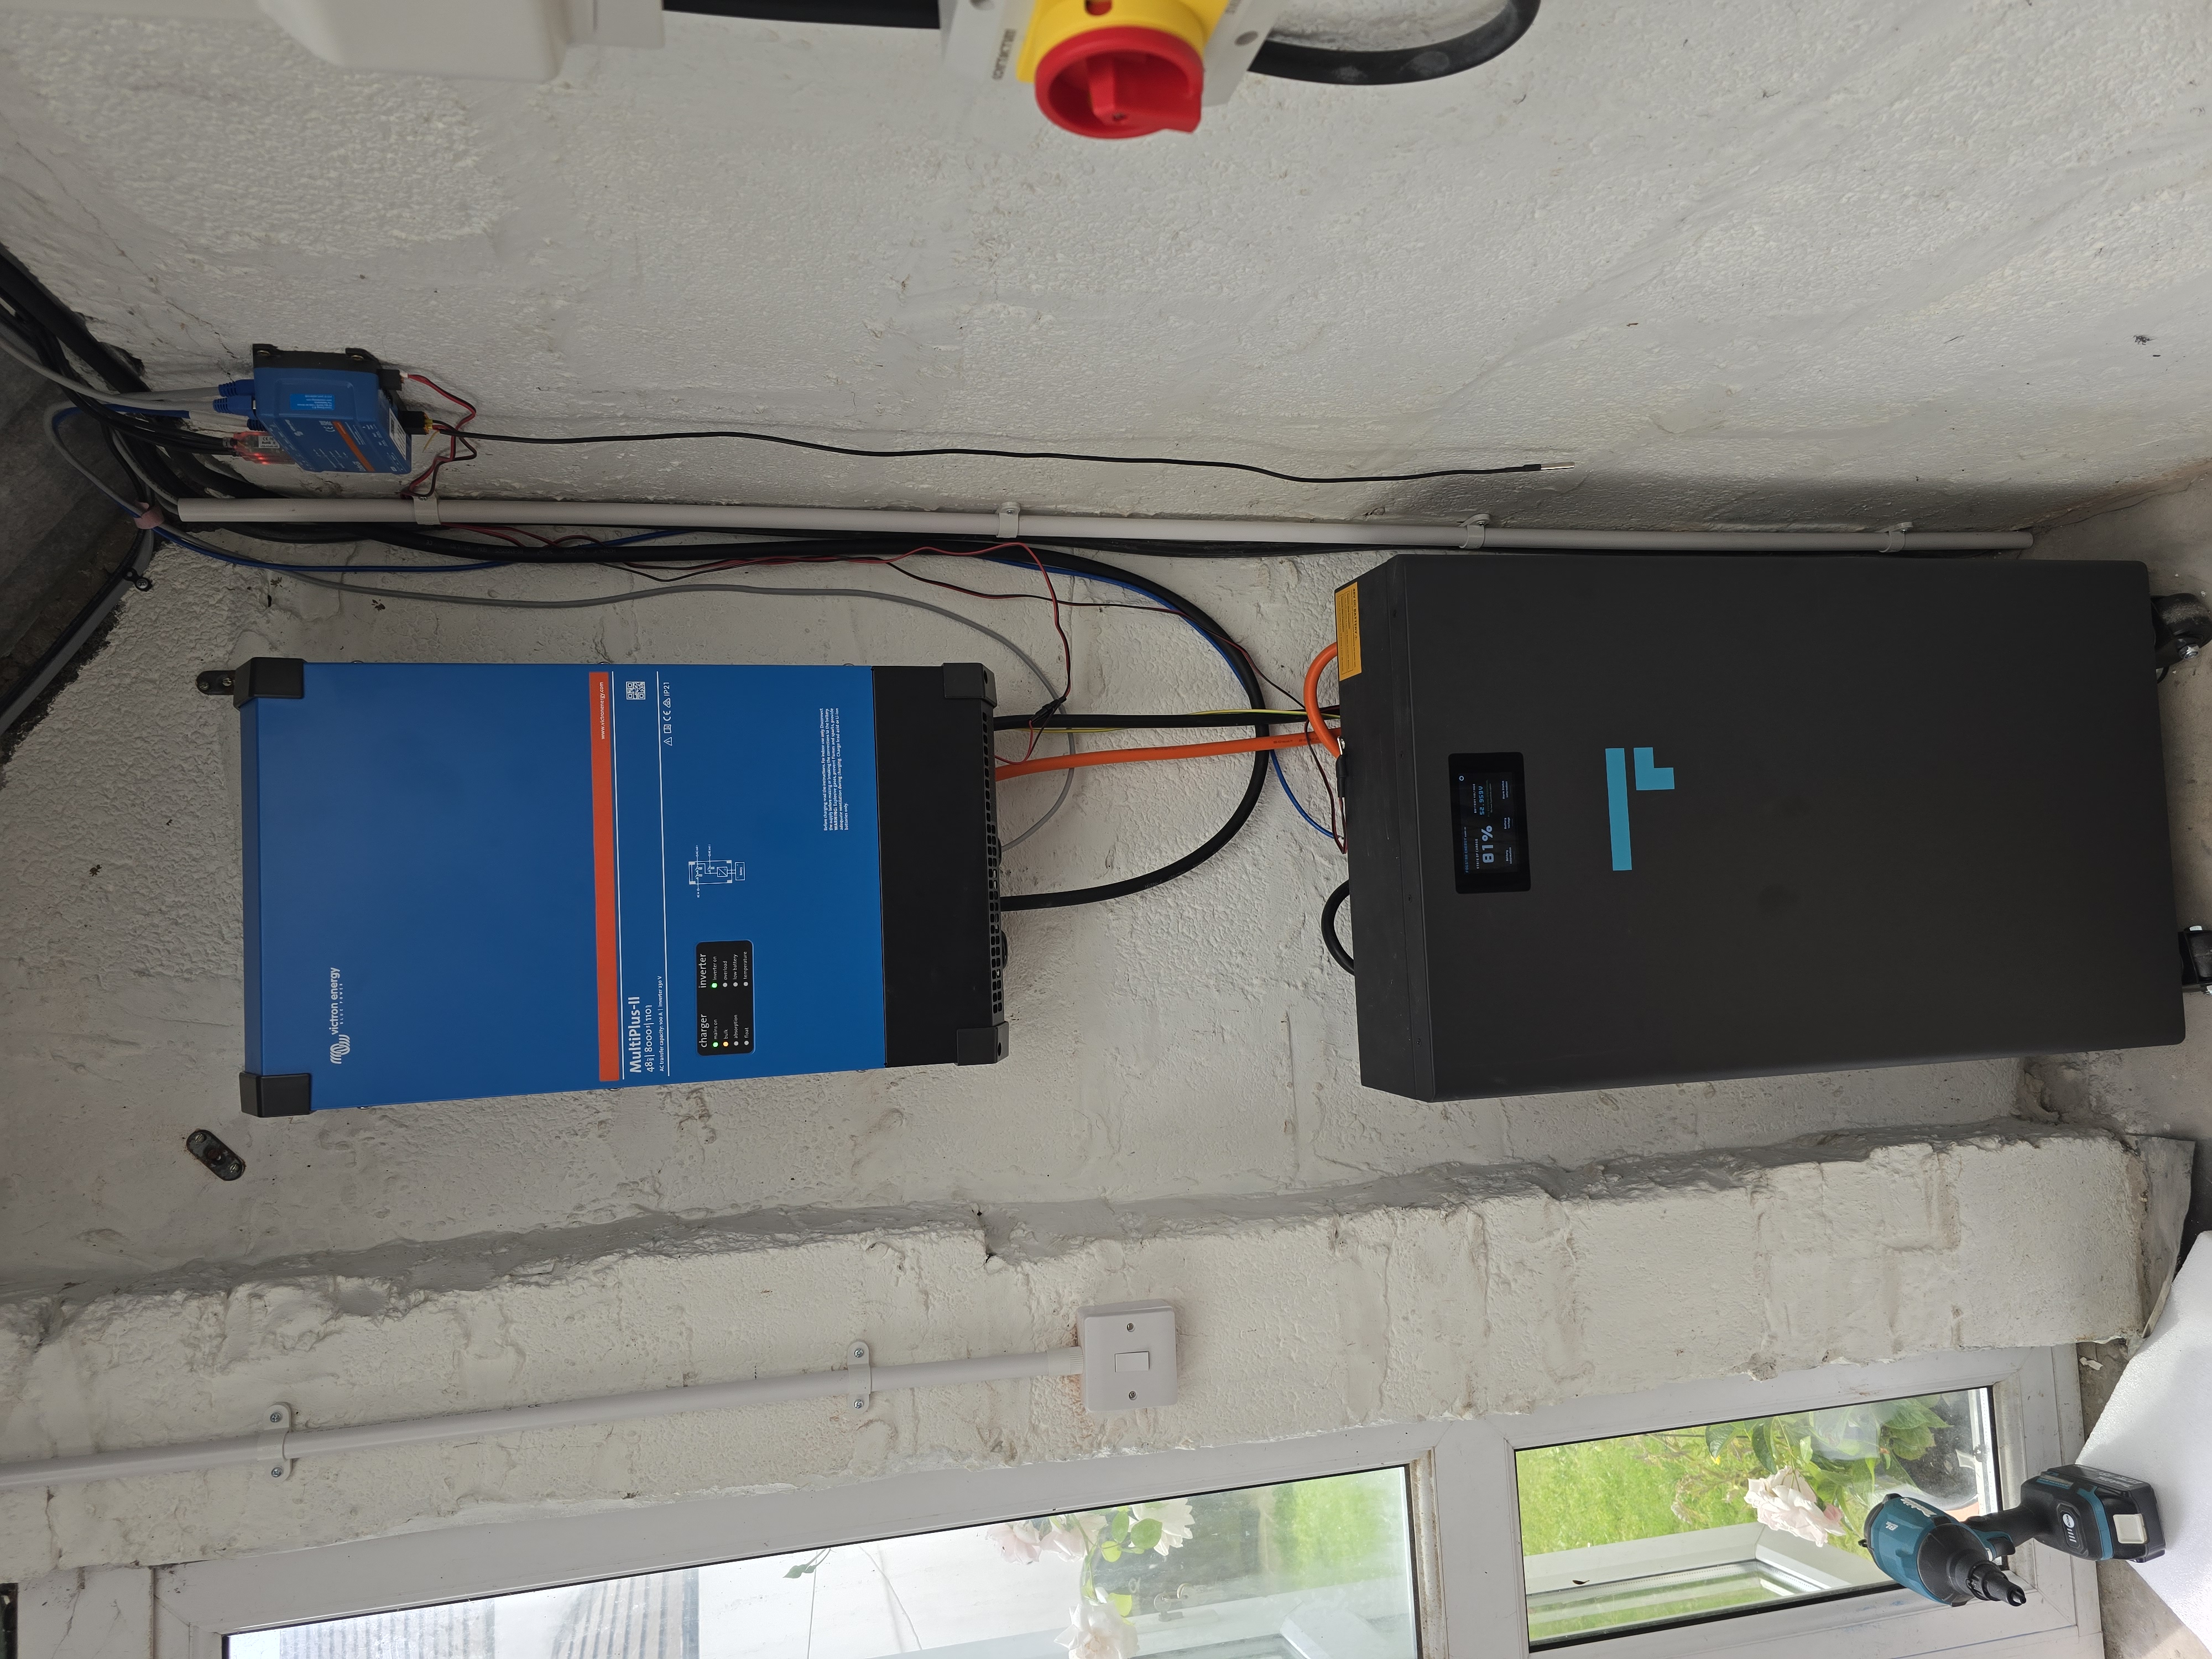
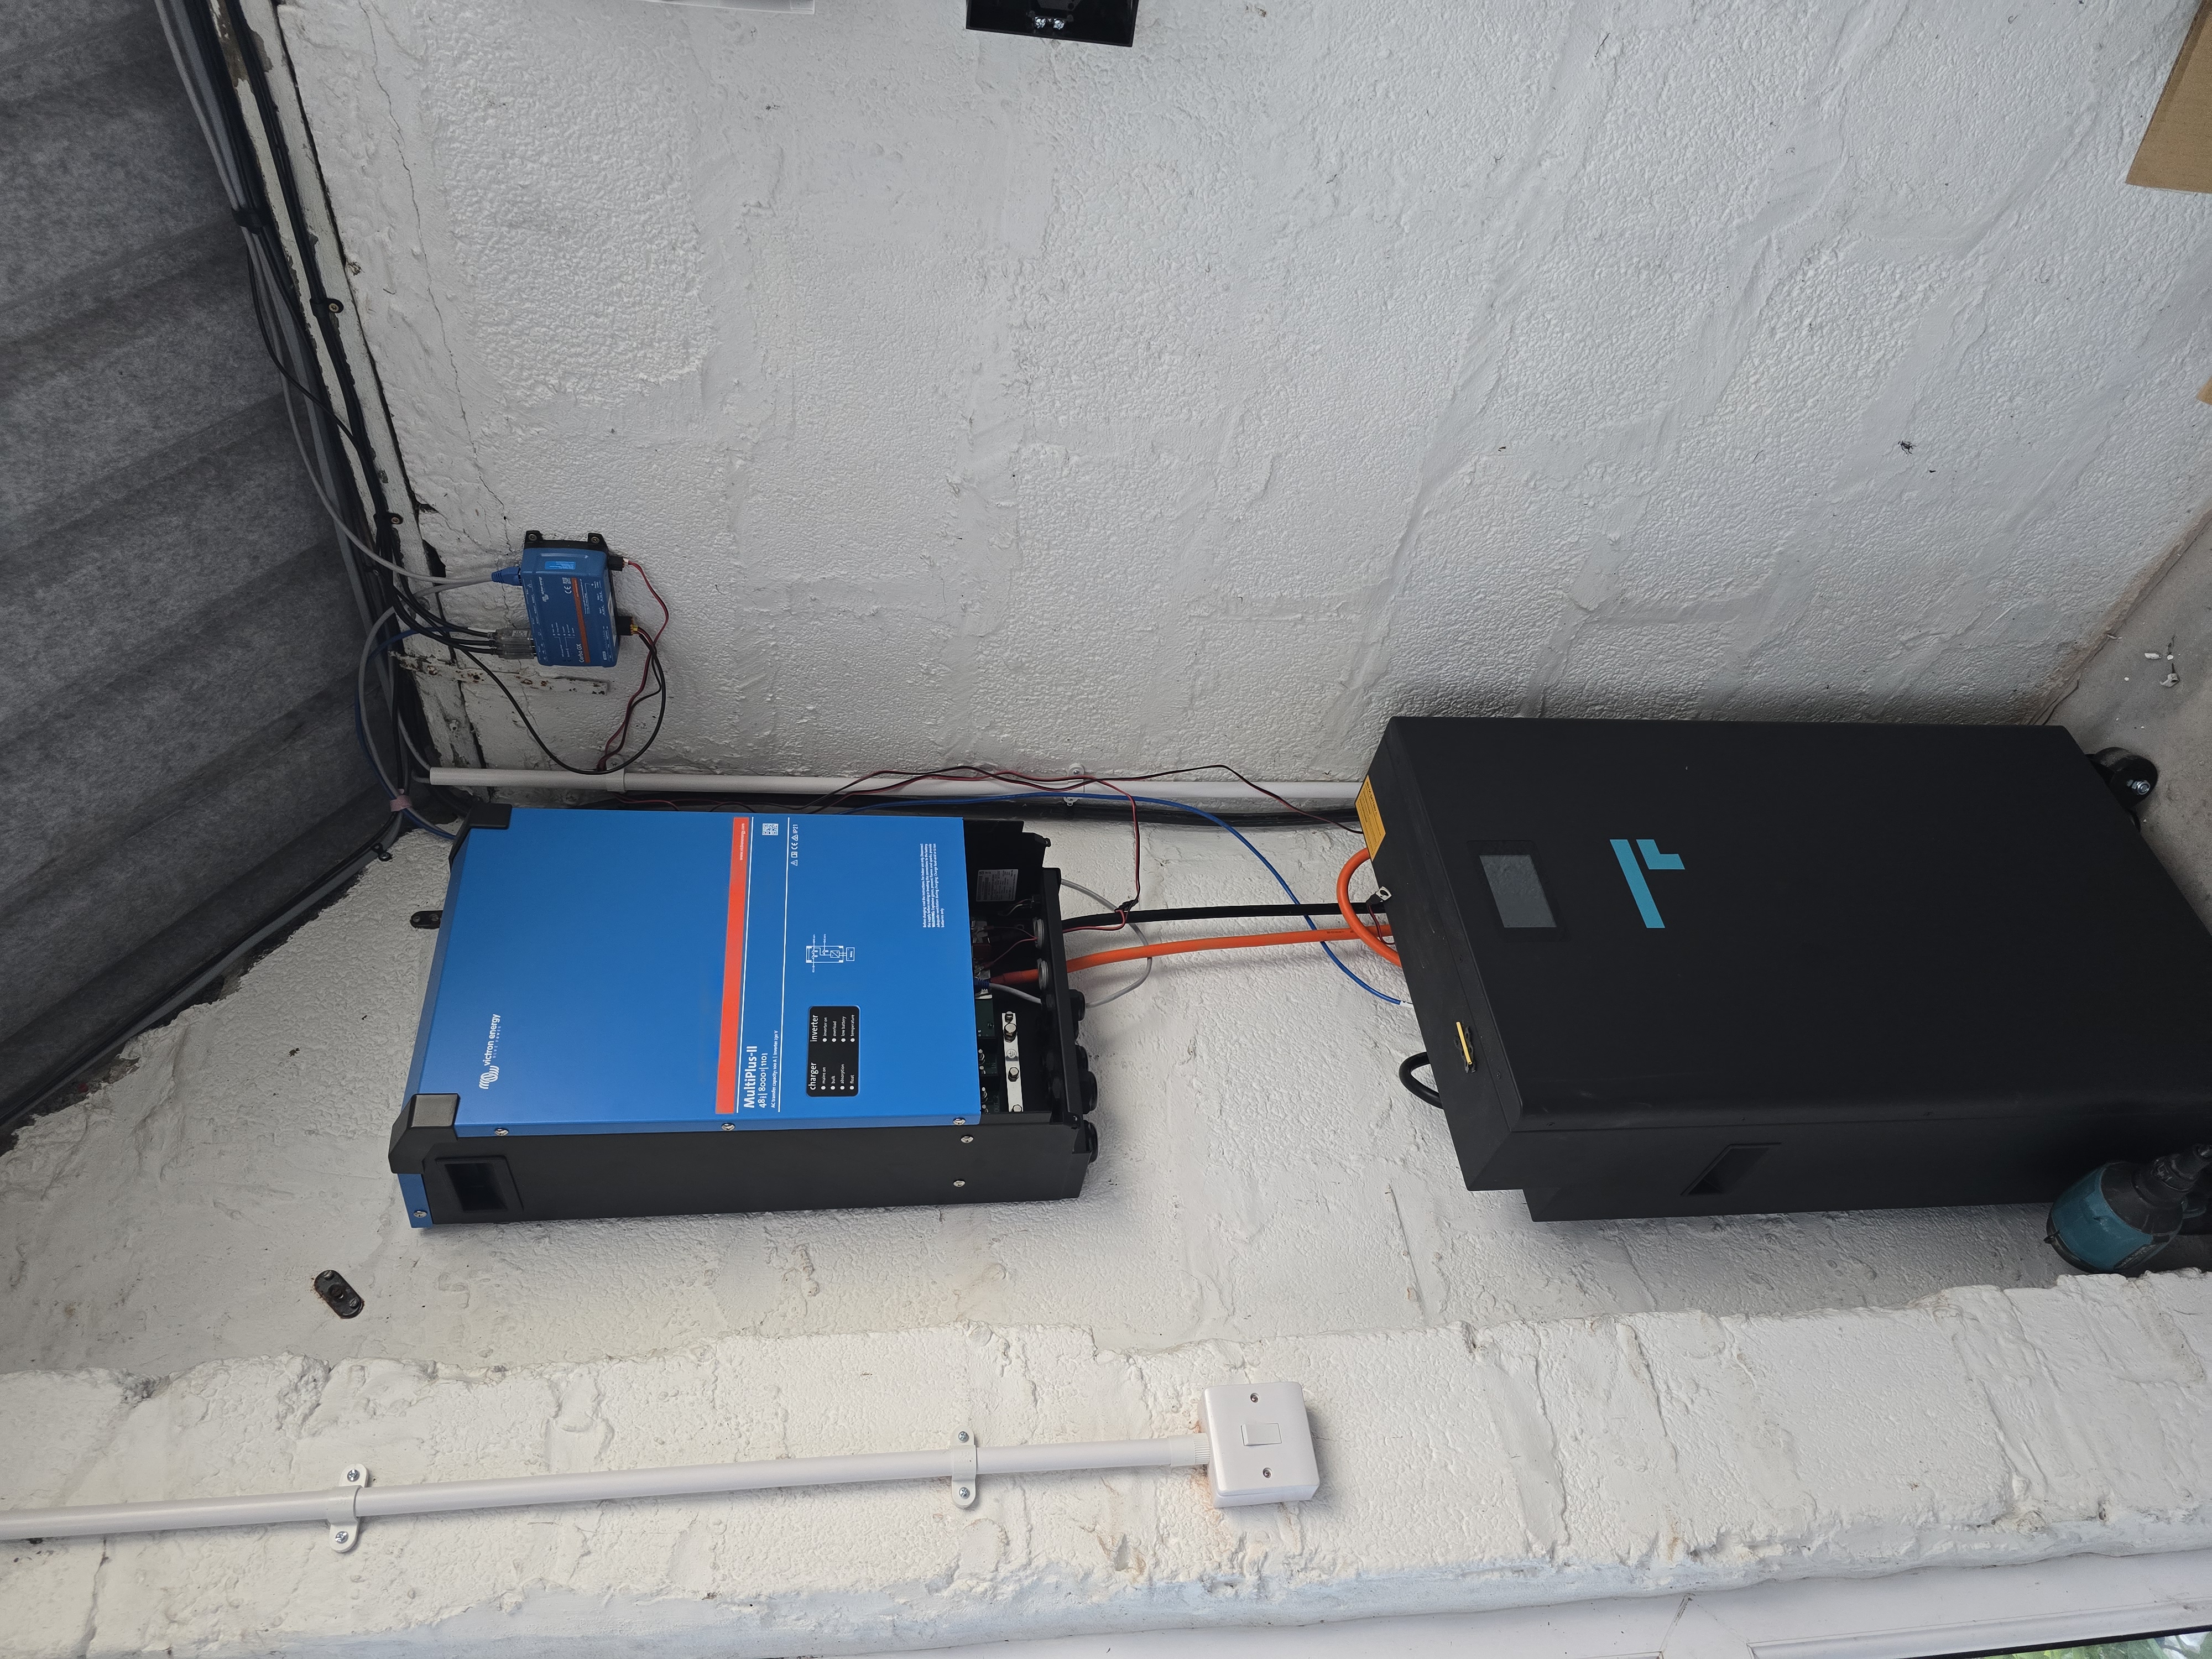
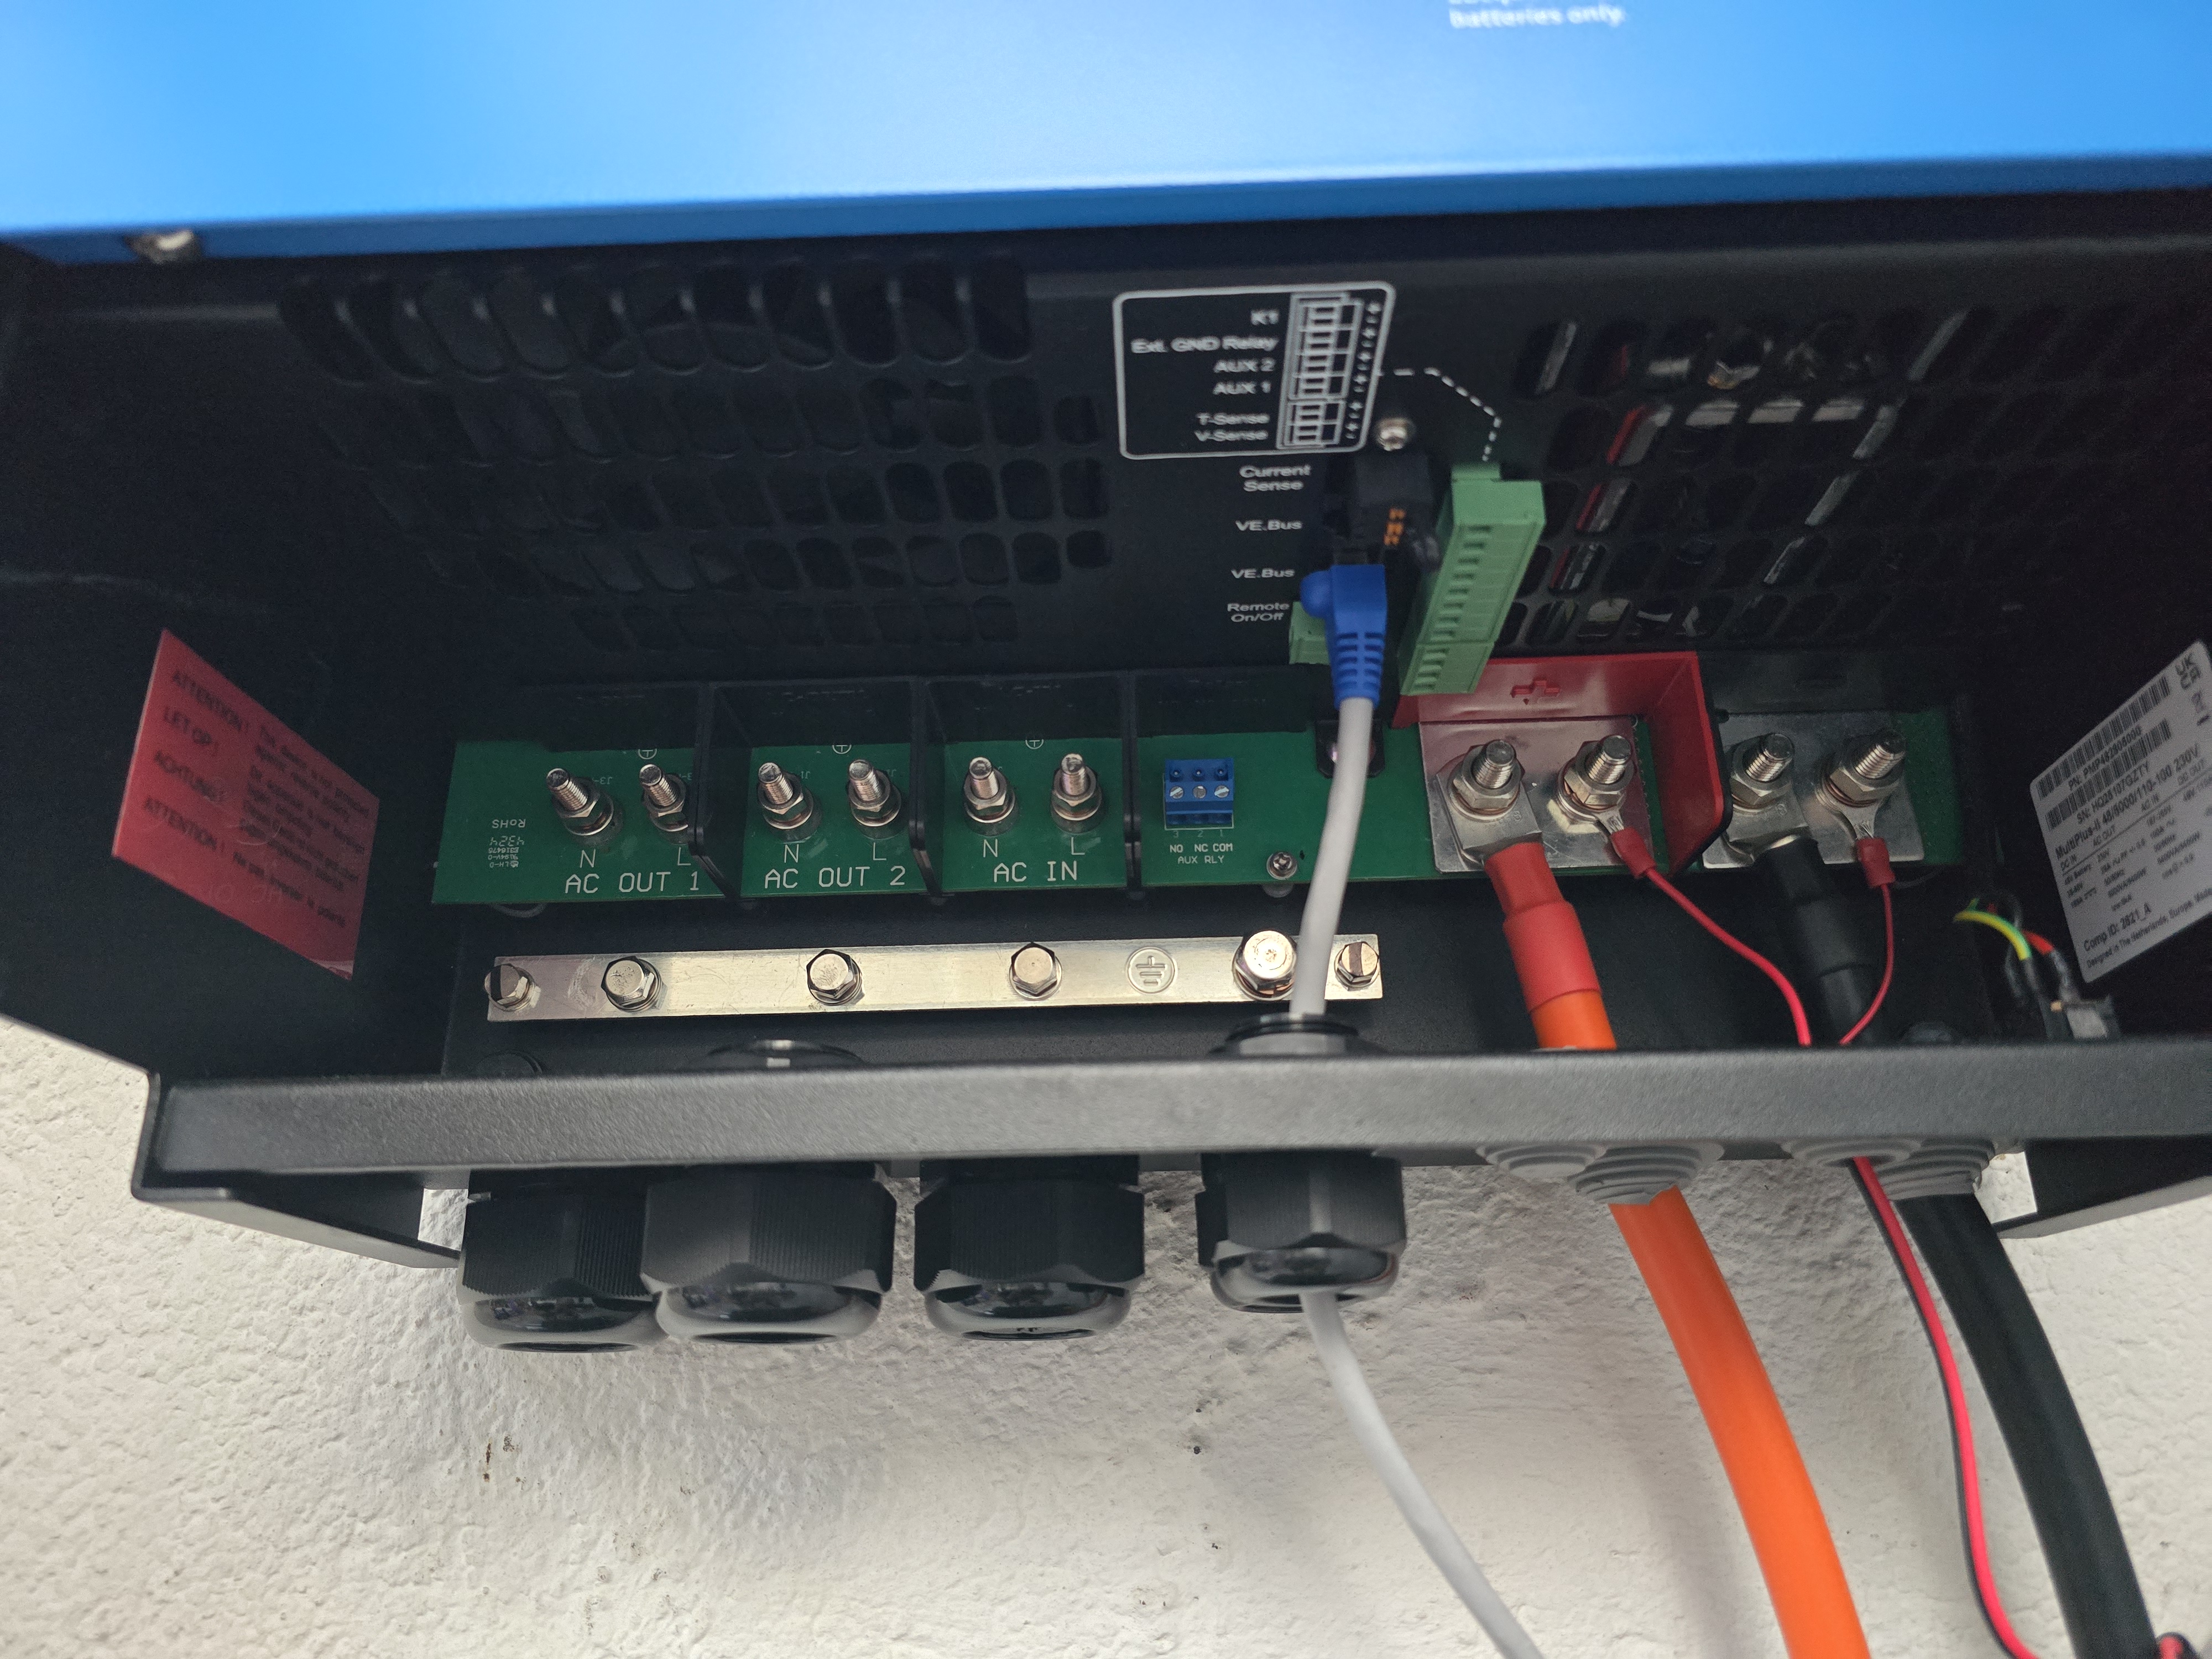
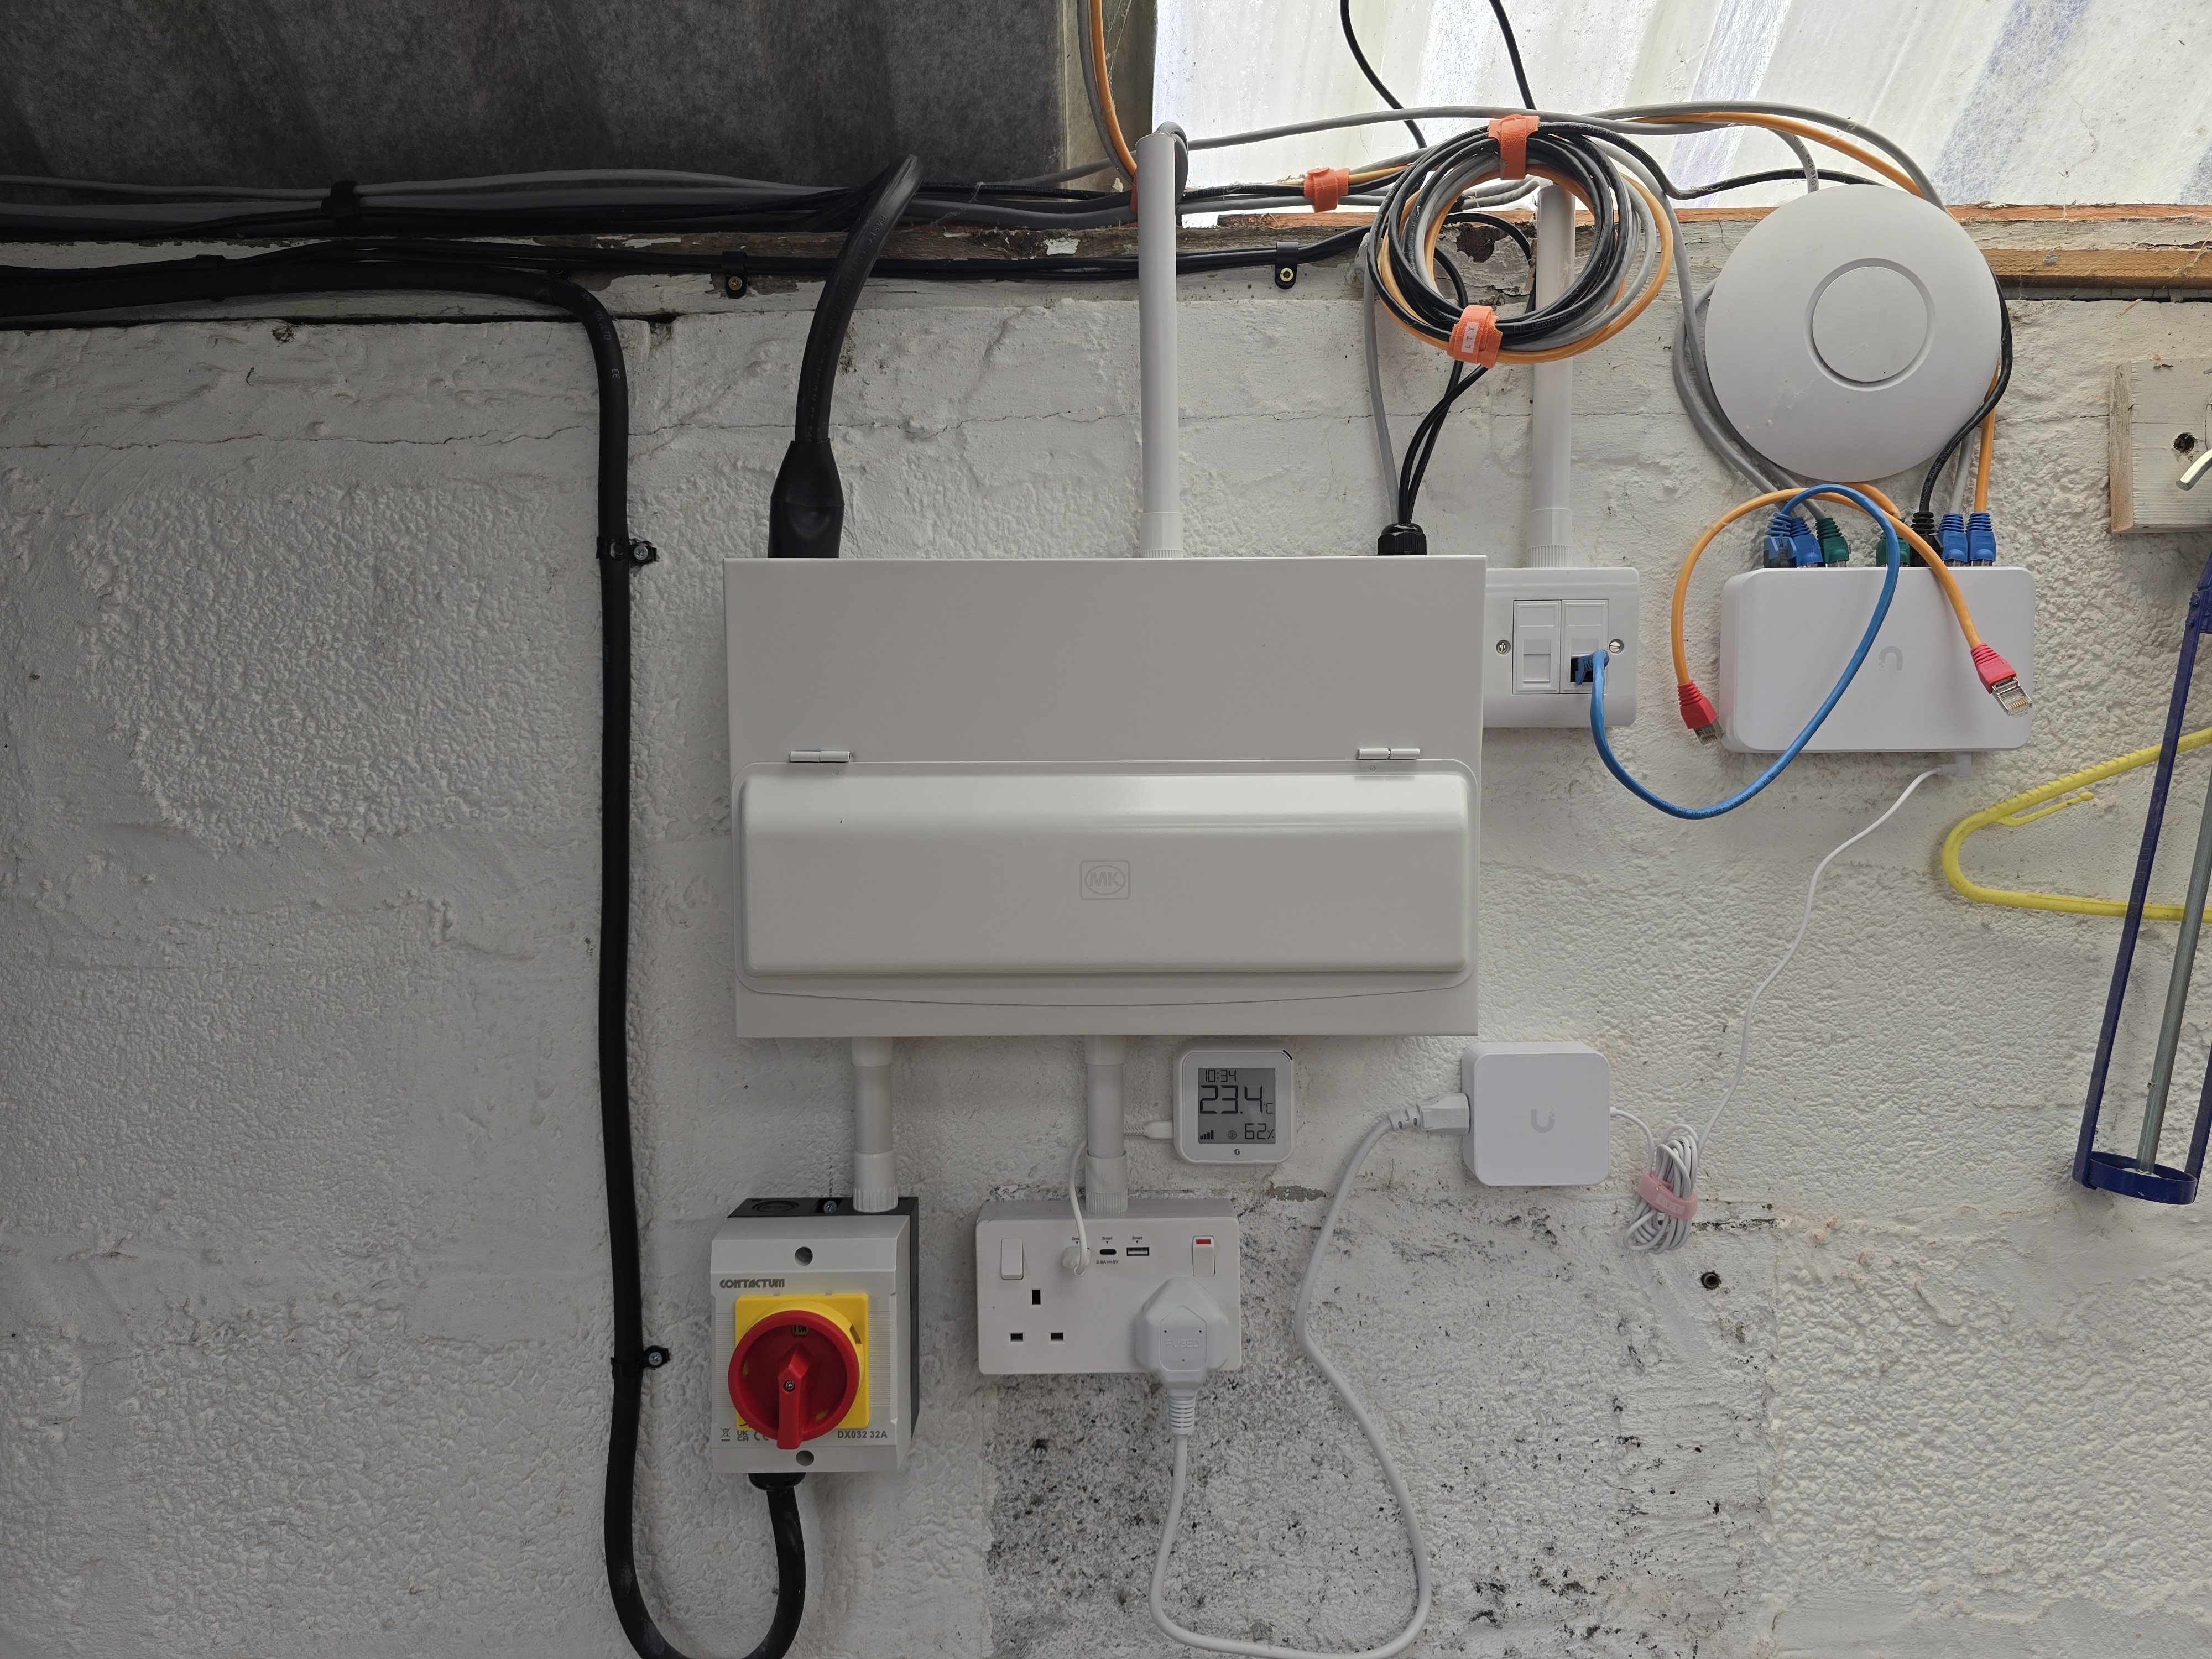
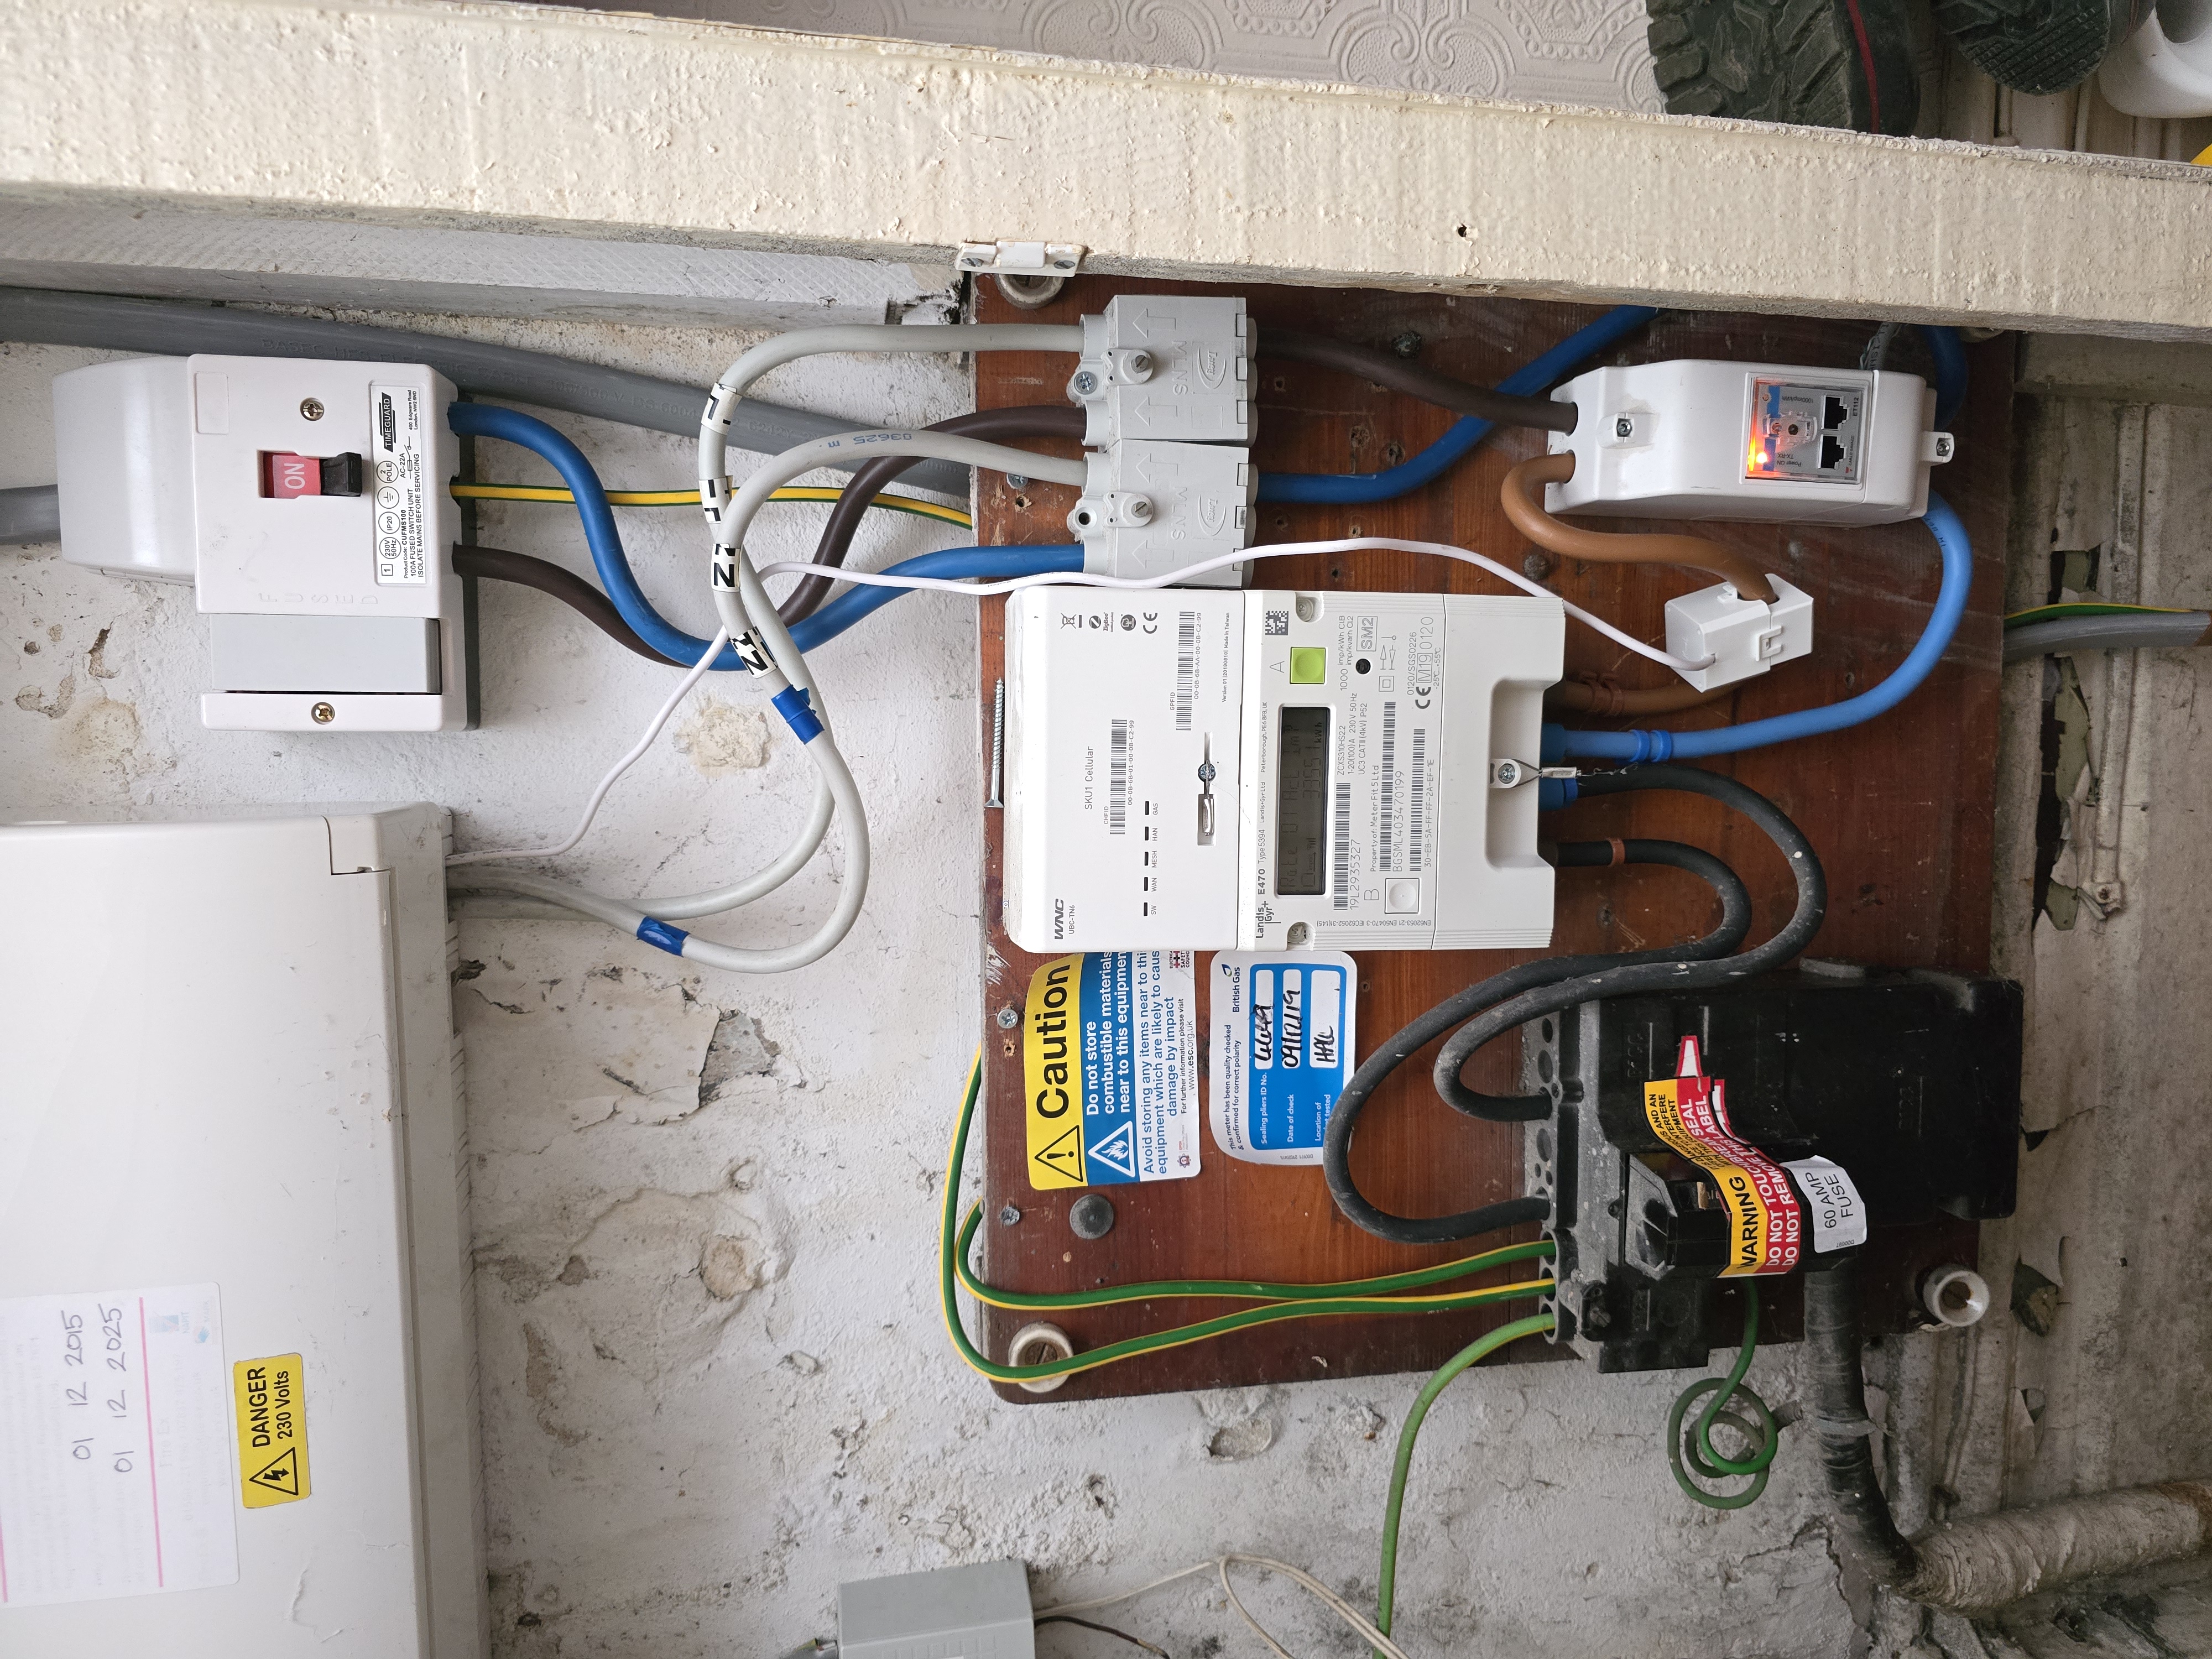
9 images of the ESS
Configuration (ESS Assistant)
Configuration for the system was overall fairly straight forward.
It took a bit of time to get the CerboGX to correctly recognise the battery, I just need to change the connection type to in Settings>Connectivity to CAN-bus BMS LV (500 kbits/s)
Adding the ESS Assistant wasn't straight forward either, mostly because I expected it to live on the CerboGX rather than the MP-II. It also requires a Windows device to upload and configure the ESS Assistant before uploading it to the MP-II via VRM Remote Configuration. The actual configuration was straightforward, although the configuration tool looks like something from Windows 95!
Automation - Octopus Agile with ESS
Automation was less straight-forward. I can see why a lot of people pay the extra for a system that is tightly coupled and they don't have to do the work to get it working.
Home assistant has good HACS integrations for Octopus and Victron and these are the foundation of the automations I put together. After exploring the integrations in general, I could see that Octopus exposes the Agile rates for the current day and the next day when they're released.
Finding the Cheapest Rates
The first step was to try and find the cheapest rates within a 24 hour period. This is supported out of the box by the Target Rates sensor, although this is in the process of being extracted to a separate Target Timeframes integration. I couldn't get this working reliably, but it didn't seem too difficult and I didn't need any of the more sophisticated features offered by target timeframes.
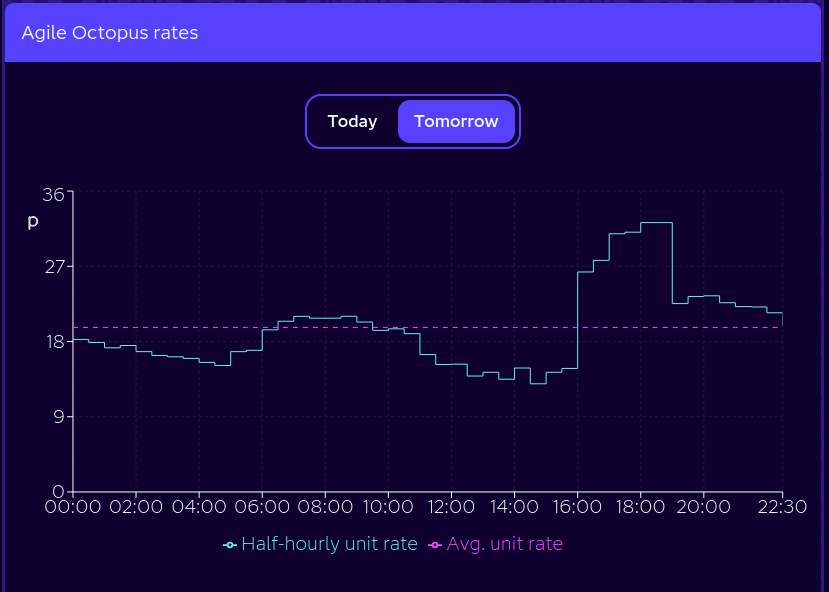
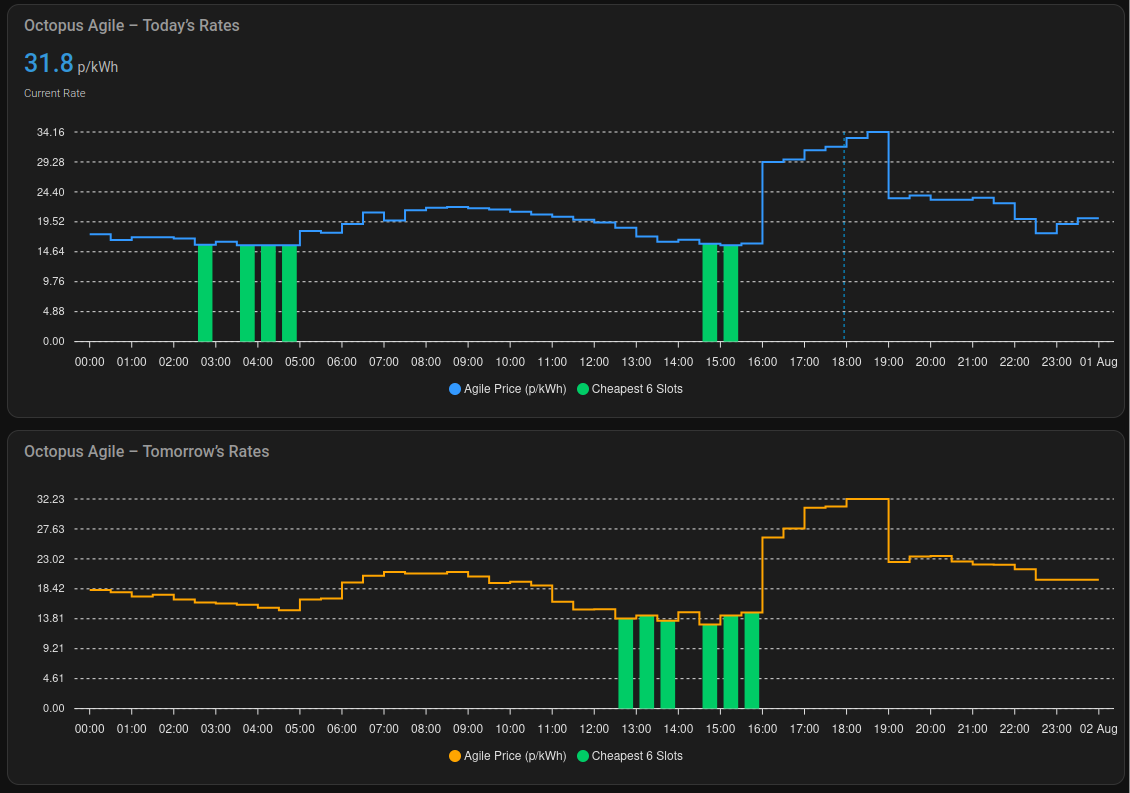
To test my logic, I first created a graph that showed the daily agile rates and highlighted the least expensive time slots. This is very similar to the rate graph that octopus provides.
Graph Code
type: custom:apexcharts-card
apex_config:
  chart:
    height: 300
  stroke:
    curve: stepline
header:
  title: Octopus Agile – Today’s Rates
  show: true
  show_states: true
  colorize_states: true
graph_span: 1d
span:
  start: day
now:
  show: true
yaxis:
  - min: 0
    decimals: 2
series:
  - entity: >-
      event.octopus_energy_electricity_xxx_xxx_current_day_rates
    name: Agile Price (p/kWh)
    type: line
    color: "#3399ff"
    show:
      in_header: false
      legend_value: false
    stroke_width: 2
    data_generator: |
      const rates = entity.attributes.rates || [];
      return rates.map(rate => {
        const ts = new Date(rate.start).getTime();
        return [ts, rate.value_inc_vat * 100];
      });
  - entity: sensor.octopus_energy_electricity_xxx_xxx_current_rate
    name: Current Rate
    type: line
    show:
      in_chart: false
    unit: p/kWh
    transform: return x * 100;
  - entity: >-
      event.octopus_energy_electricity_xxx_xxx_current_day_rates
    name: Cheapest 6 Slots
    type: column
    color: "#00cc66"
    show:
      in_header: false
      legend_value: false
    data_generator: >
      const rates = [...entity.attributes.rates || []];

      // Sort by price ascending

      const sorted = [...rates].sort((a, b) => a.value_inc_vat -
      b.value_inc_vat);

      const cheapest = sorted.slice(0, 6).map(r => r.start);


      return rates.map(rate => {
        const start = new Date(rate.start).getTime();
        const end = new Date(rate.end).getTime();
        const midpoint = (start + end) / 2;
        const isCheapest = cheapest.includes(rate.start);
        return [midpoint, isCheapest ? rate.value_inc_vat * 100 : null];
      });
We simply sort the rates by the cheapest and pluck the first 6, which gives us the 3 least expensive hours.
That proved the logic, and was pretty simple syntax to write. That definitely lulled me into a false sense of security for the complexity of the next step
I wanted to set up an automation in HA to find those cheapest slots, store them, then trigger the battery to charge during those windows.
Simples.... Right.... (I am certain there is an easier way to do this, but this is now working so I'm not touching it for a bit!)
Storing the battery charge times
The Octopus integration fires an event when the next day rates are updated. So that was my starting point. Processing those dates to find the cheapest 6 took me way down the rabbit hole.
Agile Rates Updated Automation
alias: Agile Rates Updated
description: >-
  Compute & store 6 cheapest half-hour slots (with full times & prices), notify
  on change
triggers:
  - event_type: octopus_energy_electricity_next_day_rates
    trigger: event
actions:
  - data:
      notification_id: battery_charge_times
      title: 🔋 Battery charge times update in progress
      message: |-
        🕓 Started at:

        Calculating cheapest slots…
    action: persistent_notification.create
  - response_variable: ps_result
    action: python_script.store_battery_charge_times
    data: {}
  - choose:
      - conditions:
          - condition: template
            value_template: ""
        sequence:
          - data:
              notification_id: battery_charge_times
            action: persistent_notification.dismiss
    default:
      - variables:
          slot_msg: |-
             🚫 Next-day rates not available yet
      - data:
          notification_id: battery_charge_times
          title: 🔋 Battery charge times updated
          message: |-
            🕓 Ran at:


        action: persistent_notification.create
      - data:
          title: Tomorrow’s Battery charge times 🔋
          message: |-
            🕓 Ran at:


          data:
            clickAction: /energy-custom/4
        action: notify.mobile_app_device
variables:
  triggered_at: ""
mode: single
Story Battery Charge Time Python Script
# python_scripts/store_battery_charge_times.py
# Processes next-day Octopus rates, stores cheapest slots, and returns change status

# Entity IDs and constants
NEXT_DAY_RATES_FROM_OCTOPUS = 'event.octopus_energy_electricity_19l2935327_2199998228556_next_day_rates'
CURRENT_DAY_RATES_FROM_OCTOPUS = 'event.octopus_energy_electricity_19l2935327_2199998228556_current_day_rates'
SENSOR_ENTITY = 'sensor.scheduled_battery_charge_times'
CHARGING_SLOTS_COUNT = 6

# Prepare output dict for automation
output = {}

def get_raw_rates_from_event(event):
    """Retrieve the rates event entity or log an error."""
    event_state = hass.states.get(event)
    if not event_state:
        logger.error(f"Rates event '{event}' not found")
    return event_state.attributes.get('rates', []) if event_state else []


def merge_consecutive_slots(slots):
    """
    Given a list of slots sorted by start time, merge any where
    one slot’s end == the next slot’s start, and set the merged
    slot’s price to the average of all merged slots’ prices.
    """
    merged = []
    current_group = []

    for slot in slots:
        if current_group and slot['start'] == current_group[-1]['end']:
            # still consecutive—add to current run
            current_group.append(slot)
        else:
            # break in sequence: flush previous run (if any)
            if current_group:
                # compute the merged slot for that run
                start = current_group[0]['start']
                end   = current_group[-1]['end']
                avg_price = sum(s['price'] for s in current_group) / len(current_group)
                rounded_avg = round(avg_price, 3)
                merged.append({'start': start, 'end': end, 'price': rounded_avg})
            # start a new run
            current_group = [slot]

    # flush the final run
    if current_group:
        start = current_group[0]['start']
        end   = current_group[-1]['end']
        avg_price = sum(s['price'] for s in current_group) / len(current_group)
        rounded_avg = round(avg_price, 3)
        merged.append({'start': start, 'end': end, 'price': rounded_avg})

    return merged


def build_charging_slots(raw_rates, count):
    """Sort raw rates by price and build list of cheapest slots."""
    sorted_rates = sorted(raw_rates, key=lambda r: r['value_inc_vat'])
    cheapest_six = [
        {
            'start': r['start'],
            'end':   r['end'],
            'price': round(r['value_inc_vat'] * 100, 2)
        }
        for r in sorted_rates[:count]
    ]
    cheapest_six.sort(key=lambda s: s['start'])
    return merge_consecutive_slots(cheapest_six)


def get_old_slots():
    """Retrieve existing slots from the sensor, or None if not present."""
    old_slots_store = hass.states.get(SENSOR_ENTITY)
    return old_slots_store.attributes.get('charge_times') if old_slots_store else None


def get_and_store_old_slots_from_raw():
    raw_rates = get_raw_rates_from_event(CURRENT_DAY_RATES_FROM_OCTOPUS)
    slots = build_charging_slots(raw_rates, CHARGING_SLOTS_COUNT)
    store_new_slots(slots)
    return slots


def store_new_slots(new_slots):
    for slot in new_slots:
        if isinstance(slot['start'], datetime.datetime):
            slot['start'] = slot['start'].isoformat()
        if isinstance(slot['end'], datetime.datetime):
            slot['end'] = slot['end'].isoformat()

    hass.states.set(
        SENSOR_ENTITY,
        'ok',
        {'charge_times': new_slots}
    )


def previous_slots_in_progress(old_slots):
    if not old_slots:
        return False

    start_value = old_slots[0]['start']
    end_value = old_slots[-1]['end']

    start_dt = start_value if isinstance(start_value, datetime.datetime) else dt_util.parse_datetime(start_value)
    end_dt = end_value if isinstance(end_value, datetime.datetime) else dt_util.parse_datetime(end_value)

    now = dt_util.utcnow().astimezone(start_dt.tzinfo)
    return start_dt <= now < end_dt


def parse_slots(slots):
    parsed = []
    for s in slots or []:
        parsed.append({
            'start': dt_util.parse_datetime(s['start']),
            'end':   dt_util.parse_datetime(s['end']),
            'price': s['price']
        })
    return parsed


def main():
    # 1) Fetch and parse rates
    raw_rates = get_raw_rates_from_event(NEXT_DAY_RATES_FROM_OCTOPUS)
    old_slots = get_old_slots()
    if not old_slots:
        old_slots = get_and_store_old_slots_from_raw()

    if not old_slots:
        logger.error(f"Old Slots Not Found, something has gone wrong!")

    if raw_rates:
        output['rates_available'] = True
        # 2) Compute cheapest slots list
        new_slots = build_charging_slots(raw_rates, CHARGING_SLOTS_COUNT)
        old_slots_parsed = parse_slots(old_slots)

        # 3) Compare to old
        changed = (old_slots_parsed != new_slots)
        output['changed'] = changed
        output['new_slots'] = new_slots
        output['old_slots'] = old_slots

        if changed and new_slots:
            # if no previous slots, or last-old end ≤ now, then store
            if not previous_slots_in_progress(old_slots):
                store_new_slots(new_slots)
                output['slots'] = new_slots
            else:
                # last old slot still in future → skip write/notification
                output['slots'] = old_slots
                output['old_slots_in_progress'] = previous_slots_in_progress(old_slots)
    else:
        output['rates_available'] = False
        output['changed'] = False
        output['old_slots_in_progress'] = previous_slots_in_progress(old_slots)


# Execute
main()
The python script actually does a little more, because once you've gone that far, then why not. So it merges any adjacent slots and averages their cost. I don't actually use the costs at the moment, but I might do in the future.
The Scheduled Battery Charge Times sensor's attributes end up like:
charge_times:
  - start: "2025-07-31T02:30:00+01:00"
    end: "2025-07-31T03:00:00+01:00"
    price: 15.79
  - start: "2025-07-31T03:30:00+01:00"
    end: "2025-07-31T05:00:00+01:00"
    price: 15.71
  - start: "2025-07-31T14:30:00+01:00"
    end: "2025-07-31T15:30:00+01:00"
    price: 15.835
Cool, so with that, we should be able to build a schedule and automate the charge times.
Talking to the CerboGX
Before we get to the scheduling, we need to get Home Assistant to talk to the Victron CerboGX the majority of the work was done by tfboy on the Home Assistant forums. However, I already have an MQTT integration, so it took a few extra steps to get this to work alongside that.
A fairly simple Node-RED flow was needed to bridge between the Cerbo's MQTT Broker and the EMQX broker that I had running on Home Assistant
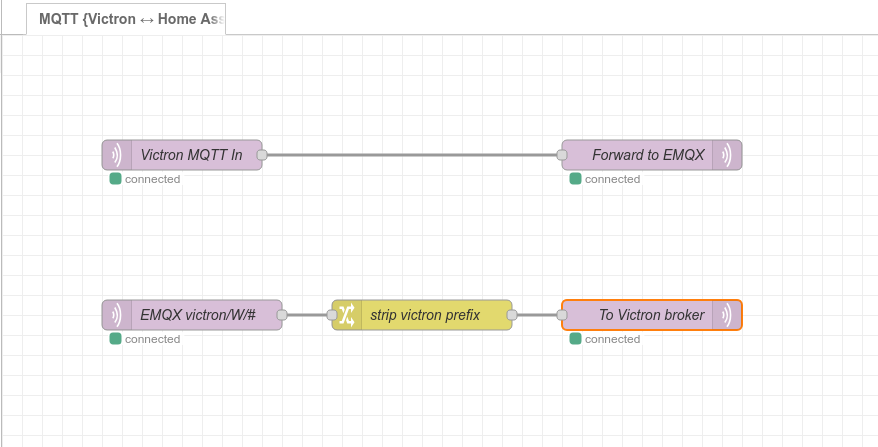
Not sure if any extra detail is needed here, happy to provide if you need it! ✉️
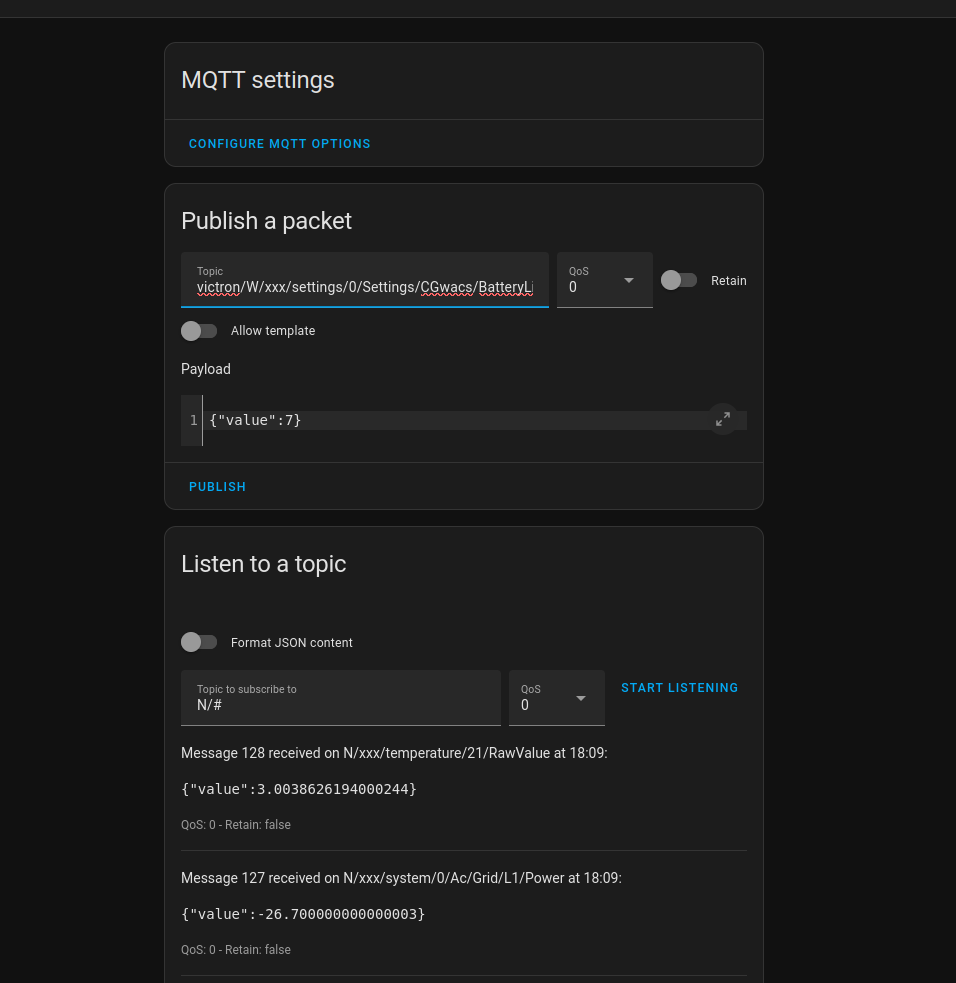
Once that was set up, I could listen the the N/# topic to see the messages the CerboGX was publishing and publish a simple
packet to trigger the battery to charge or discharge.
Scheduling the Battery Charging
On IOG, scheduling will become a lot easier. Set the battery to only charge during the off-peak hours and disable discharge when the EVC is charging.
On Agile, now we have the rates, and we know how to trigger the charging schedule, we're rolling!
My "Battery Charging Scheduler" automation went a bit further than I meant it to, but I wanted to keep it flexible to allow me to modify as needed in the future.
This involved templating a new binary sensor. Not something I'd done in home assistant before but it's a powerful tool.
Every minute, the automation runs and checks the current state and then updates the "Battery Charging Window Active" binary sensor. The sensor looks at the Scheduled Battery Charge Times > Charge Times, compares it with now and turns on if it's in a window. It also stores the Current Charge window and Next Charge Window.
Battery Charging Window Active Sensor
# templates.yaml

# ——————————————————————————————————————————————
# Battery Charging Window Active
# ——————————————————————————————————————————————
- binary_sensor:
    - name: "Battery Charging Window Active"
      device_class: power

      # ON if now() falls inside any slot
      state: >
        {{ state_attr('binary_sensor.battery_charging_window_active','in_charge_window') }}

      attributes:
        current_slot_start: >
          {%- set slots  = state_attr('sensor.scheduled_battery_charge_times','charge_times') or [] -%}
          {%- set now_ts = as_timestamp(now())                                  -%}
          {%- for slot in slots                                                 -%}
            {%- set start_ts = as_timestamp(slot.start)                         -%}
            {%- set end_ts   = as_timestamp(slot.end)                           -%}
            {%- if start_ts <= now_ts <= end_ts                                  %}
              {{ slot.start }}
              {%- break                                                         -%}
            {%- endif                                                           -%}
          {%- endfor                                                            -%}

        current_slot_end: >
          {%- set slots  = state_attr('sensor.scheduled_battery_charge_times','charge_times') or [] -%}
          {%- set now_ts = as_timestamp(now())                                  -%}
          {%- for slot in slots                                                 -%}
            {%- set start_ts = as_timestamp(slot.start)                         -%}
            {%- set end_ts   = as_timestamp(slot.end)                           -%}
            {%- if start_ts <= now_ts <= end_ts                                  %}
              {{ slot.end }}
              {%- break                                                         -%}
            {%- endif                                                           -%}
          {%- endfor                                                            -%}

        next_slot_start: >
          {%- set slots  = state_attr('sensor.scheduled_battery_charge_times','charge_times') or [] -%}
          {%- set now_ts = as_timestamp(now())                                  -%}
          {%- set ns = namespace(next='')                                       -%}
          {%- for slot in slots | sort(attribute='start')                       -%}
            {%- set start_ts = as_timestamp(slot.start)                         -%}
            {%- if start_ts > now_ts                                            -%}
              {%- set ns.next = slot.start                                      -%}
              {%- break                                                         -%}
            {%- endif                                                           -%}
          {%- endfor                                                            -%}
          {{ ns.next if ns.next else "No Future Slots" }}

        next_slot_end: >
          {%- set slots  = state_attr('sensor.scheduled_battery_charge_times','charge_times') or [] -%}
          {%- set now_ts = as_timestamp(now())                                  -%}
          {%- set ns = namespace(next='')                                       -%}
          {%- for slot in slots | sort(attribute='start')                       -%}
            {%- set start_ts = as_timestamp(slot.start)                         -%}
            {%- if start_ts > now_ts                                            -%}
              {%- set ns.next = slot.end                                        -%}
              {%- break                                                         -%}
            {%- endif                                                           -%}
          {%- endfor                                                            -%}
          {{ ns.next if ns.next else "No Future Slots" }}

        now: >
          {{ now() }}

        in_charge_window: >
          {{ state_attr('binary_sensor.battery_charging_window_active','current_slot_start') | default('') | length > 0 }}

        all_slots_today: >
          {{ state_attr('sensor.scheduled_battery_charge_times','charge_times') }}
After updating that sensor, the Scheduler automation does a bit of logic and fires a few notifications before triggering the MQTT message to start the battery charging.
Battery Charging Scheduler Automation
alias: Battery Charging Scheduler
description: ""
triggers:
  - minutes: /1
    trigger: time_pattern
actions:
  - target:
      entity_id: binary_sensor.battery_charging_window_active
    action: homeassistant.update_entity
    data: {}
  - variables:
      new_state: "{{ states('binary_sensor.battery_charging_window_active') }}"
  - choose:
      - conditions:
          - condition: template
            alias: If in new charging window, but battery is above 80%
            value_template: |
              {{ previous_state != new_state
                 and new_state == 'on'
                 and (states('sensor.victron_battery_soc')|float >= 80) }}
        sequence:
          - data:
              title: 🔋 Charge Session Skipped
              message: >
                Battery charge session skipped at {{ now() | as_timestamp  |
                timestamp_custom('%I:%M:%S %p') }}  because SoC={{
                states('sensor.victron_battery_soc') }}%.
            action: persistent_notification.create
          - data:
              title: 🔋 Charge Session Skipped
              message: >
                Battery charge session skipped at {{ now() | as_timestamp  |
                timestamp_custom('%I:%M:%S %p') }}  because SoC={{
                states('sensor.victron_battery_soc') }}%.
            action: notify.mobile_app_device
      - conditions:
          - condition: template
            alias: >-
              In charging window and (state has changed or battery is not
              already charging) and battery is below 80%
            value_template: |
              {{ new_state == 'on'
                 and (previous_state != new_state or states('sensor.victron_system_battery_state') != 'CHARGING')
                 and (states('sensor.victron_battery_soc')|float < 80) }}
        sequence:
          - data:
              topic: >-
                victron/W/xxx/settings/0/Settings/CGwacs/BatteryLife/Schedule/Charge/4/Day
              payload: "{\"value\":7}"
            action: mqtt.publish
          - data:
              notification_id: battery_charging_scheduler
              title: 🔋 Battery charging started
              message: >
                Started at {{ now() | as_timestamp  | timestamp_custom('%I:%M:%S
                %p') }}
            action: persistent_notification.create
      - conditions:
          - condition: template
            alias: >-
              Out of charging window and (state has changed or battery is not
              discharging)
            value_template: |
              {{ new_state == 'off'
                 and (previous_state != new_state or states('sensor.victron_system_battery_state') != 'DISCHARGING') }}
        sequence:
          - data:
              topic: >-
                victron/W/xxx/settings/0/Settings/CGwacs/BatteryLife/Schedule/Charge/4/Day
              payload: "{\"value\":-7}"
            action: mqtt.publish
          - data:
              notification_id: battery_charging_scheduler
              title: 🔋 Battery charging ended
              message: >
                Ended at {{ now() | as_timestamp  | timestamp_custom('%I:%M:%S
                %p') }}
            action: persistent_notification.create
variables:
  previous_state: "{{ states('binary_sensor.battery_charging_window_active') }}"
mode: single
Tracking the Charging
The final thing I added was an automation to track when the battery was actually charging and how much it had charged.
Battery Charging Session Tracker Automation
alias: Battery Charge Session Tracker
description: Track when charging starts and ends, log it, and send a mobile notification.
triggers:
  - entity_id: sensor.victron_system_battery_state
    to: CHARGING
    trigger: state
  - entity_id: sensor.victron_system_battery_state
    from: CHARGING
    trigger: state
actions:
  - choose:
      - conditions:
          - condition: template
            value_template: >
              {{ trigger.to_state is defined and trigger.to_state.state ==
              'CHARGING' }}
            alias: If charging has started
        sequence:
          - variables:
              start_ts: "{{ as_timestamp(now()) }}"
              start_soc: "{{ states('sensor.victron_battery_soc') | float }}"
          - data:
              name: Battery
              message: >
                Charge started at {{ start_ts | timestamp_custom('%H:%M') }}
                (SoC {{ start_soc }}%).
            action: logbook.log
          - data:
              notification_id: battery_charge_session_tracker_{{start_ts}}
              title: Battery Charging Started 🪫✅
              message: >
                Charge started at {{ start_ts | timestamp_custom('%H:%M') }}
                (SoC {{ start_soc }}%).
            action: persistent_notification.create
          - data:
              entity_id: input_text.current_battery_charge_session
              value: |
                {{ { 'start': start_ts,
                     'start_soc': start_soc } | to_json }}
            action: input_text.set_value
      - conditions:
          - condition: template
            value_template: >
              {{ trigger.from_state is defined and trigger.from_state.state ==
              'CHARGING' }}
            alias: If charging has finished
        sequence:
          - variables:
              end_ts: "{{ as_timestamp(now()) }}"
              end_soc: "{{ states('sensor.victron_battery_soc') | float }}"
              session: >-
                {{ states('input_text.current_battery_charge_session') |
                from_json }}
              start_ts: "{{ session.start }}"
              start_soc: "{{ session.start_soc }}"
              notification_id: battery_charge_session_tracker_{{start_ts}}
              notification_message: >
                Charged from {{ start_ts | timestamp_custom('%H:%M') }} (SoC {{
                start_soc }}%) to {{ end_ts | timestamp_custom('%H:%M') }} (SoC
                {{ end_soc }}%).
          - choose:
              - conditions:
                  - condition: template
                    value_template: |
                      {{ (end_ts - start_ts) > 300 }}
                sequence:
                  - data:
                      name: Battery
                      message: >
                        Charge ended at {{ end_ts | timestamp_custom('%H:%M') }}
                        (SoC {{ end_soc }}%).
                    action: logbook.log
                  - data:
                      notification_id: "{{ notification_id }}"
                      title: Battery Charging Ended🔋🏁
                      message: "{{ notification_message }}"
                    action: persistent_notification.create
                  - data:
                      title: Battery Charging Ended🔋🏁
                      message: "{{ notification_message }}"
                    action: notify.mobile_app_device
                alias: If charging lasted more than 5 minutes
            default:
              - data:
                  notification_id: "{{ notification_id }}"
                action: persistent_notification.dismiss
mode: single
Conclusion
I'm really glad this is all up and running. The automation side of it was more work that I expected.
I hope this has been useful to anyone else looking at setting up a home ESS system, if you have any questions or want to know more, please feel free to email me
Savings Update
Now everything has been running for a few days, I have some good examples of the savings.
Longer term savings update is here: 10 month update
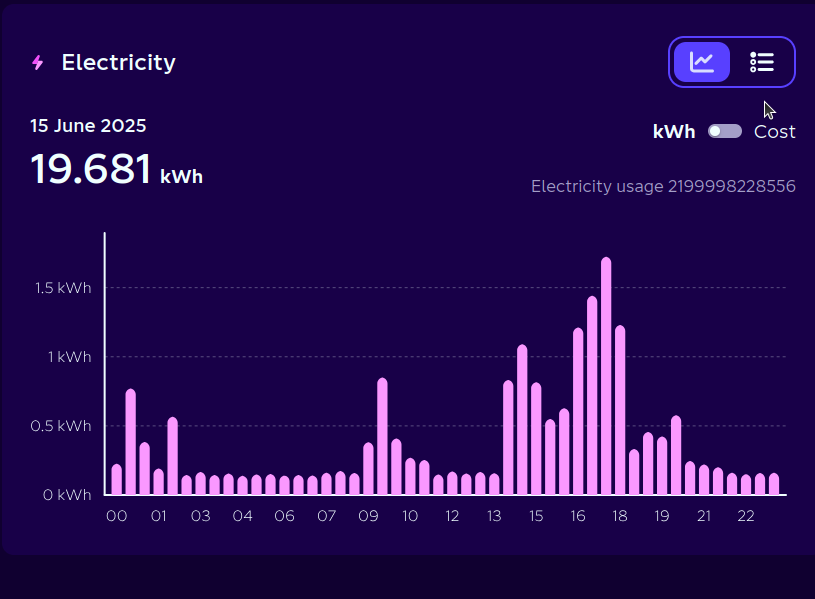
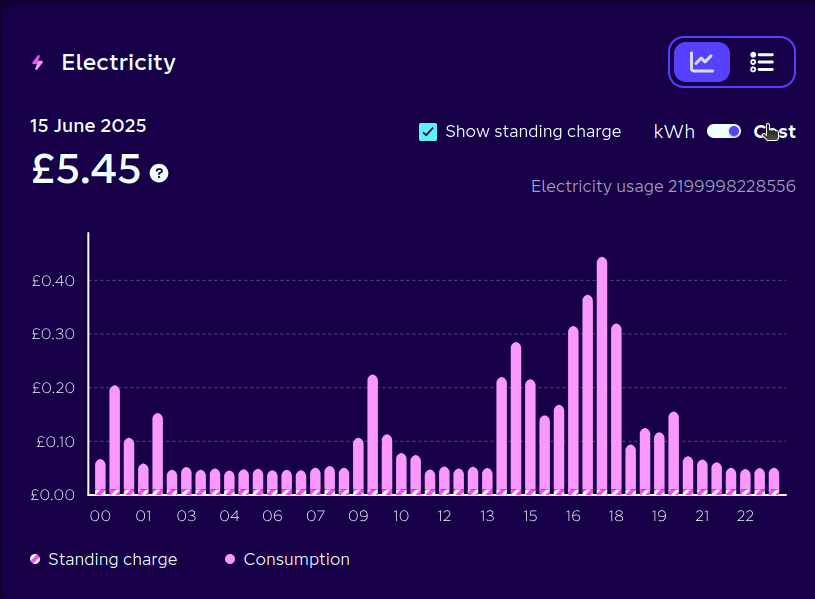
Before
15th June: 19.7kWh cost £5.45
25th June: 18kWh cost £5.15
After
3rd August: 22kWh cost £2.24
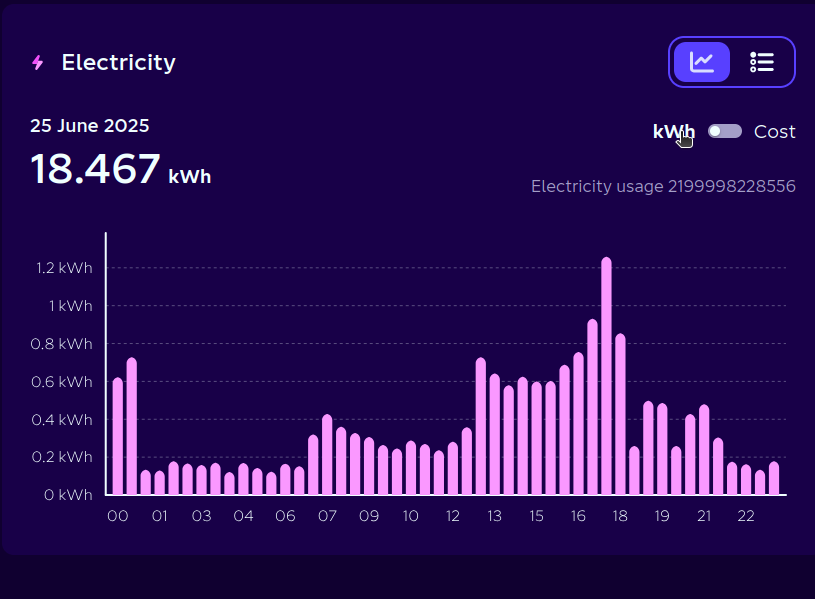
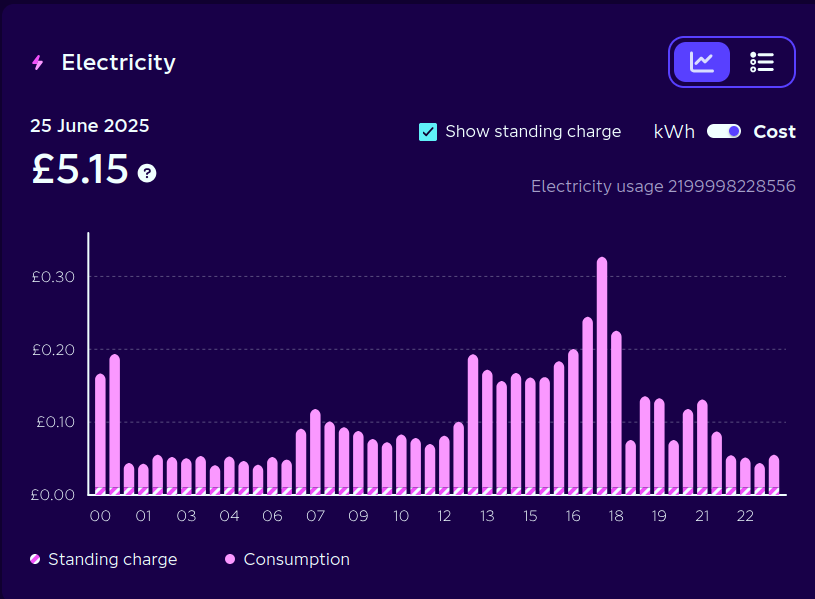
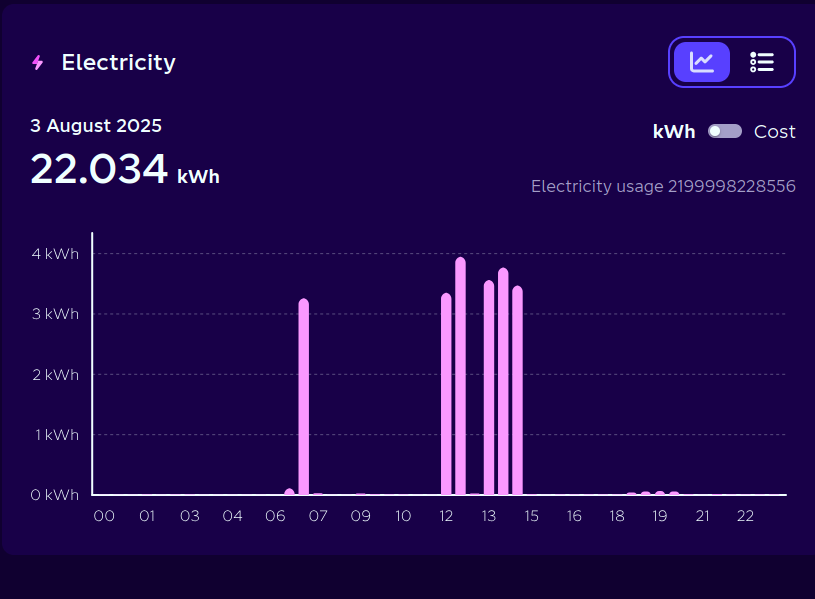
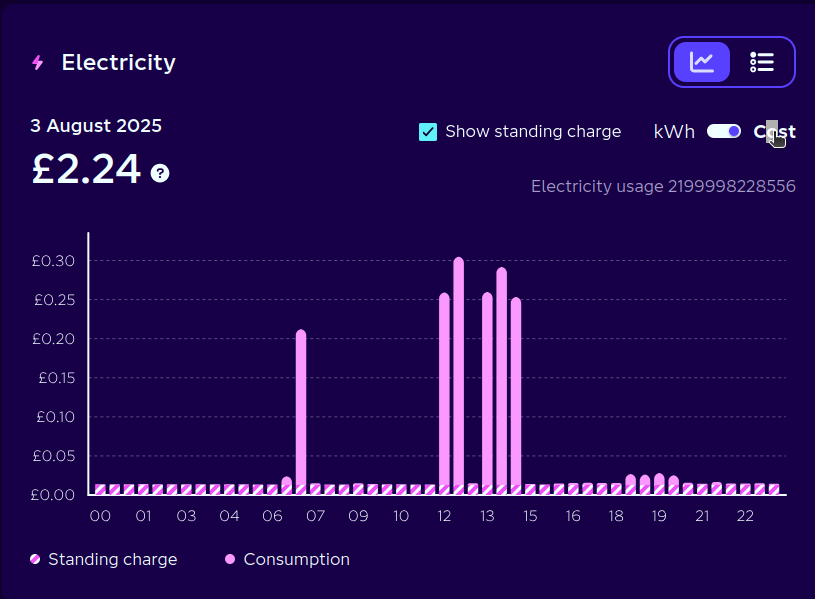
4 Screenshots from before and 2 from after the installation went live
Update (May 2026)
This system has been running for 10 months now. I've written a 10 month update with savings figures, EV charger integration details and FAQs.